Adding a Product and Product Details
- 03 May 2024
- 8 Minutes to read
- Print
- DarkLight
- PDF
Adding a Product and Product Details
- Updated on 03 May 2024
- 8 Minutes to read
- Print
- DarkLight
- PDF
Article summary
Did you find this summary helpful?
Thank you for your feedback
To add a new product, Login to WineDirect > Products > ADD PRODUCT
General
In the General information of a product, a number of mandatory and optional fields are available to give an overview of what a product is.

| Field | Function |
| Brand (Optional) | This will be the generic brand of the product. Existing brands can be selected, or select "Add Brand" at the bottom of the dropdown menu to create a new brand. |
| Product Name | This will be the product's specific and individual name. |
| Product Type | Choices of product types are General Product (i.e., Merchandise, Glassware), Wine, Bundle, or Tasting. |
| Weight | This will be the total weight of the product that is being sold in pounds (lb) |
| SKU | is a "stock keeping unit" and a data field that will be used to differentiate products and track inventory levels. |
| UPC/Barcode (Optional) | A UPC/Barcode or a "Universal Product Code" is affixed to a product wherever it is sold within a retail marketplace. |
| Product Description (Optional) | The description is a section to add more detailed information about a product. |
Availability
In the Availability section, you can choose which channel you wish a product to be visible in (i.e., Ecommerce Storefront, POS, None). This is also where you can toggle the Active status of a product. If an item is not set to Active, it will not be visible in any channel, regardless of the selection.
Categories
The Categories window will allow you to make a product visible on your Ecommerce website and POS app on a category page. This defines what class the product will be displayed at purchase.

Add Category
If you wish to add a custom for a specific channel or your POS, click the "+ Add Category" at the top right of the section. A new "Add Category" window will open.

Choose a new name for your product category and decide whether it will be a stand-alone category or organized under a "Parent category." Selecting No Parent Category will allow a dropdown menu to appear on the website when hovering over the Shop in the main navigation.

New categories within a parent category will be found on the website by selecting Shop. In the new window that opens, the product categories will be available on the left side of the screen.

Pricing
In the pricing window, you will set the default price of your product, create a sale price at the cost of goods, and there is the availability to add an MSRP price. You will also be able to interact with the tax settings of this product; you can choose to use the default taxes or provide your tax codes for this product.
From the pricing window, you can also define your purchase volume requirements. You can set a minimum quantity purchase amount or a maximum quantity purchase amount. You will also be able to create bulk pricing.

- Default Price - This will be the standard retail price for the product
- Sale Price - If you are offering a promotion for a product, this price will be displayed beneath the Default Price
- Cost - This is your cost of the product. This is an optional attribute for tracking your profit or loss in your reports. This pricing will not be visible to customers
- MSRP - This will show the Manufactures Suggested Retail Price of your product so that you can illustrate cost savings to your customers
- Tax Class - This allows you to configure different Tax Rates to suit your business needs
- Tax Code - Tax Codes are required to calculate sales tax during checkout. These codes can be found through the Avalara Tax Code Search Engine
- Purchase ability - On your Ecommerce website, you can notify customers if they can purchase the product, view the product and not buy it, or have a product coming soon
- Minimum/Maximum Quantity - You can use this option if you wish for there to be a mandatory minimum amount of a product to be purchased per customer
Bulk Pricing and Tiers
When creating bulk pricing, products can receive a Percentage (% Discount) of their total cost, a Dollar Off Per Unit ($ Off/Unit), or a fixed dollar amount of total cost ($ Fixed Amount) discount.
Bulk Pricing Tiers are the rules by which bulk pricing is calculated for customers when a product is purchased. A minimum quantity is required to qualify for bulk pricing and the total discount amount (i.e., If a customer purchases 36 bottles of wine, they get $10 off per bottle). The new Unit Price will automatically be calculated for each tier created.

IMPORTANT NOTE: The new Unit Price calculated is defined as the new Default Price. This is not a Sale Price. Automatic promotions will apply to bulk prices even if a promotion is set not to include items already on sale.
Product Attributes
In the product details window, you create the details associated with a particular product. You can define characteristics such as wine type, varietal, region and appellation, vineyard designation, food pairings, acid levels, aging potential, etc.

To add a new attribute, select the add attribute button
To update or delete an attribute, select the"..." Or meatball menu; from here, choose to edit the point or delete the quality.
Adding Attributes
Once clicking Add Attributes, a new window will open with a dropdown menu. Select which attribute you wish to add. There will either be some form of text box to fill in (i.e., Total Sugar) or a dropdown menu to choose a specific attribute (i.e., Varietal). Most dropdown menu attributes will allow you to add a custom attribute if you do not find a specific attribute.

Accolades
The accolades window will allow you to add any number of received awards for your wines, such as reviews from Spectator magazine or other wine rating systems. You can add a new award by selecting the add accolade button.

To update or delete an accolade, select the "..." or meatball menu, and from there, choose to edit the award or delete the tribute.
Add Accolades
Selecting ADD ACCOLADES, a new window will open to fill in the following fields:
- Name of the provider or Reviewer
- The score, rating, or name of the award
- A summary of the review or description of the significance of the awards
- The official URL to the webpage the accolade is published

Media
The media window allows you to add and interact with different images and videos associated with your products. You may add as many photos as you would like; all images added here will be visible in the product details on your storefront. Videos must be counted as a URL link from a YouTube channel. Select the upload images button to add a new image; select the Add from URL button to add a new video.

- Default Image - Selecting this will make that media the default thumbnail and first image seen for the product on your Ecommerce website and POS.
- Images - These images will be still pictures of your choice to showcase your product. The pictures do not need to be specifically of your product. We recommend using compressed 1280x1280 images in JPG, PNG, or GIF format with a 10MB maximum.
- Videos - Videos are great multimedia options for showcasing extra information about our products alongside images. To add a video, you must click "Add from URL" (located to the left of the "Upload Images" button) and use a link to the specific YouTube video you wish to use.
Inventory
The inventory window lets you interact with your product list. You can define how many of each product you have in stock and at what point you will consider this product to be in low supply; you can also choose not to track inventory on a product-by-product basis.
You may also choose not to track a product's inventory by selecting the box at the end of the Inventory Detail section.

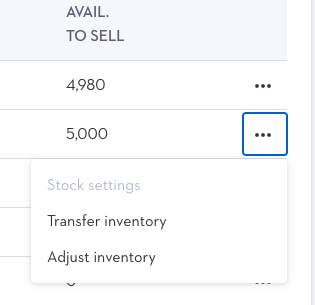
Stock Settings
If a product is being added to an Inventory Pool for the first time, the stock settings must be configured by selecting the ellipses (...) at the far right for the desired row and clicking Stock Settings.
Within the Stock Settings window the following values can be defined:
| Cell Name | Purpose | |
| stock | This is the digital value that the WineDirect system searches for when any order type is submitted. | |
| low_stock | This is the stock level that admin users will be notified of via email, alerting them that the stock of this item has diminished to a low amount. | |
| safety_stock | This is the reserve stock set in a product's profile. This ensures that a specific number of products are not sold in case of multiple orders when stock is low or a user wishes not to sell a certain amount but still needs to track inventory. |

Adjusting and Transfering Inventory
Once a product's Stock Settings have been configured, its inventory can be adjusted or transferred. Other options are available when selecting the ellipses (...) to the right of each row.
- Transfer Inventory - Moving an inventory from one Inventory Location and/or Inventory pool to another.
- Adjust Inventory - Add or subtract inventory or a specific product within a specific Inventory Location and Pool.
 Shipping
 Shipping
The shipping window allows for the defining of the shipping strategy on a product-by-product basis. A fixed price or free shipping for a specific product is defined here.
IMPORTANT NOTE: The Weight will automatically be filled in based on the value added tot he General section of the product. The other dimentions will need to be defined manually.
Related Products
The associated products window will allow you to decide whether or not you would like to display related products for a specific product. The associated products will be displayed in the product details of your storefront. You have two options when displaying related products:
- Automatic Turned On - Automatically allows the system to display products based on similar and like attributes.
- Automatic Turned Off - Define what products you would like displayed manually.

SEO and Sharing
In the SEO and sharing window, you have access to updating the product detail page title, editing the product detail page URL, and updating the meta description of the product detail page. You will also be able to generate a QR code specific to a product and toggle whether or not you would like to create automatic social media sharing options for a product.

- Page Title - The page title, also known as the title tag, is a crucial component of on-page SEO. The text appears in the search engine results pages as the title of a web page and serves as a clickable link to the page.
- URL - This is the webpage for the specific product you are creating. When someone clicks on the Page Title on a search engine, it is this URL that they will be taken to.
- Meta Description - This short description provides a brief summary of your product's webpage content. It will display in the search engine results pages below the page title and URL. The meta description serves as an advertisement for the page and provides a snapshot of what the page is about.
Was this article helpful?