-Under Construction-
Check our Bi-Weekly Update Log for what is new!
Welcome to WineDirect! If you have chosen to use a WordPress-powered website, we have you covered in Ecommerce.
IMPORTANT NOTE: This document is intended for developers. Attempting to self-serve this process may result in the breaking of your website.
Download BigCommerce in WordPress
You'll first want to install and activate the BigCommerce for WordPress plugin in your WordPress admin. You can search for "BigCommerce for WordPress" in the plugins area of your WordPress admin or download it directly from WordPress.org.

During activation, you'll be asked to connect an existing BigCommerce account/create a new one, or Enter your API Credentials.
Once the BigCommerce plugin is installed, a new navigation option labeled BigCommerce will appear in WordPress. You'll be redirected to the newly created BigCommerce › Settings page, and your BigCommerce products will begin importing to WordPress (new accounts have sample products).

Change Permalink Structure
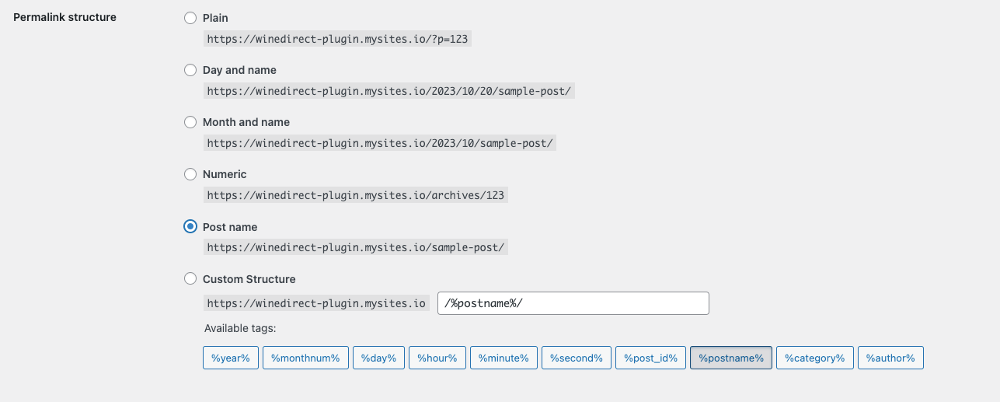
A mandatory step when setting up a WordPress website is to change the Permalink Structure to 'post name' within the WordPress settings.
To do this, Login to WorPress > Settings > PermaLink Structure > Custom Structure > input /%postname%/
Create an API Token for WordPress
Use the following steps to create an API Token within BigCommerce to be used when connecting your WordPress website
1. Login to WineDirect
2. Click Ecommerce
3. Once in the Ecommerce portal, click Settings
4. Go to the bottom of settings and click API Accounts

5. Select V2/V3 API Token and name your token. Please take note of the API path, as it is a required field when adding the token to WordPress
IMPORTANT NOTE: Take note of the API path, as it is a required field when adding the token to WordPress

6. Set the following OAuth Scopes:

Content = None
Checkout = None
Customers = Modify
Customers Login = Login
Info & Settings = Modify
Marketing = Read-Only
Orders = Read-Only
Order Transactions = Read-Only
Create Payments = None
Get Payment methods = Read-Only
Stored Payment Methods = None
Products = Read-Only
Themes = None
Carts = Modify
Checkouts = Modify
Sites & Routes = Modify
Channel Settings = Modify
Channel Listings = Modify
Storefront API Tokens = None
Storefront API Customer Impersonation Tokens = None
Store Logs = None
Store Locations = None
Store Inventory = None
Fulfillment Methods = None
Order Fulfillment = None
7. A window will pop up with the API Token information.
IMPORTANT NOTE: Copy and save this information in a secure place. Once 'DONE' is clicked, these credentials will not be accessible again.

8. Take the newly created API Credentials and API Path and follow the steps in the next steps below
Creating a WordPress Site Using API Credentials
1. To set up a WordPress site using an API token created in BigCommerce, click Enter your API credentials on the welcome screen in the BigCommerce plugin that was downloaded to your WordPress

2. Refer to the API Credentials created and saved in BigCommerce and fill in the required fields. WineDirect may have provided you with these credentials already.


3. Enter your API credentials on your WordPress site. Saving the API credentials on your WordPress site will direct you to name the Channel the plugin will create. This allows you to list products to the Channel from within BigCommerce and link orders back to the Channel from the WordPress site. You can also link to an existing channel.
4. Once you enter the API credentials and select Connect Using API Credentials, you will be taken to a new menu where you must select:
Select Channel = Create A New Channel.
New Channel Name = A name that you can easily recognize later if you generate a new channel for your WordPress connection
Automatic Listing = Yes, automatically list new BigCommerce products on this Channel
*Please note that if you select No, you cannot manage your products within your WordPress Channel. If you accidentally select No, uninstall and reinstall the BigCommerce plugin to reselect the Yes option.*
5. Finally, you will be asked for webhook preferences. Please ensure you select the following:
Enable Traditional Product Import = Full - Import and store product data in WP Database (Default)
Enable Products Webhooks = No, Please turn off webhooks
Image Imports = Full images import
Enable Customers Webhooks = No, please turn off webhooks
