- 31 Oct 2024
- 17 Minutes to read
- Print
- DarkLight
- PDF
Wine Club Processing
- Updated on 31 Oct 2024
- 17 Minutes to read
- Print
- DarkLight
- PDF
The Wine Club Processing tool allows you to batch-process your club shipment for all members active for the Club/Season/Shipment.
Best Practices For Club Processing
As you process your clubs, please take into consideration the following best practices:
- Don't process the same shipment with multiple admin users simultaneously
- Don't multi-tab the admin panel during processing
- Don't modify the club membership while processing
- Don't modify the club discount associated with a club while processing
Step 1: Choose the Club You Wish to Process
1. Navigate to Store > Clubs > Club Processing.
2. Start by selecting the Club you wish to process from the Club select from the search parameters on the left.
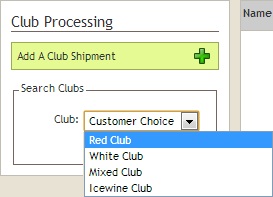
3. Once you have chosen your Club, you will hit Search.
4. Any previous club shipments will appear in the content section on the right of the page.
5. To add a new shipment click the green Add A Club Shipment button on your left.
Step 2: Shipment Setup
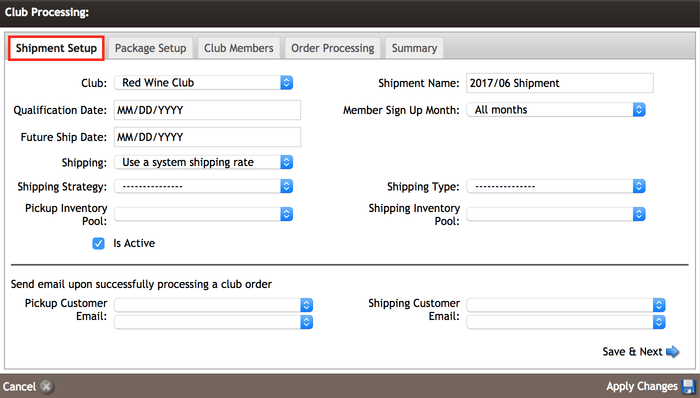
The Package Setup tab is the first tab you will arrive on to process your new shipment. This is where you will set up the product and shipping details for the shipment and select optional automatic emails to be sent to the customer upon completing processing.
Shipment Options
The first set of shipment parameters that you will want to set up is the name & shipping options. Below is a list of field definitions and their actions.
Email Options
Club shipments do not have any default email documents that are sent out when you process your shipment. This means that club members will not receive any shipment notification as they would if they placed an order online. Some options allow you to choose specific email documents to be sent to members who either pick up their order or have it shipped to them. This allows you to send custom club emails per Club.
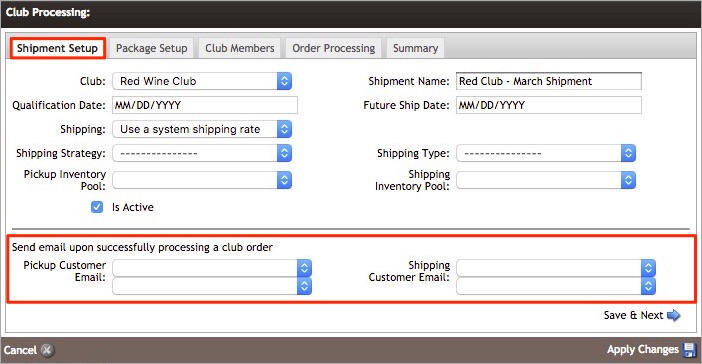
| Pickup Customer Email | Two menu selections control which email document will be sent to members who pick up their club shipment. The first selection allows you to choose your main document's category. The second selection allows you to pick the document you wish to send. This email document will only be sent after a club order has been processed. This email will only be sent to club members who are set as pickup members on their membership. For more information, please see the Contacts > Clubs Documentation. |
|---|---|
| Order | Two menu selections control which email document will be sent to members who have their club order shipped. The first selection allows you to choose your main document's category. The second selection allows you to pick the document you wish to send. This email document will only be sent after a club order has been processed. This email will only be sent to club members set to ship to their billing address or an alternate shipping address on their membership. For more information, please see the Contacts > Clubs Documentation. Please Note: For more information on creating email documents, please see the Email Documents Documentation. |
Step 3: Package Setup
The next tab in your shipment setup is the Package Setup tab, where you will choose the products included in your shipment.

Adding Products:
1. Click on the text Click To Add An Item To This Package or the green [+] icon.
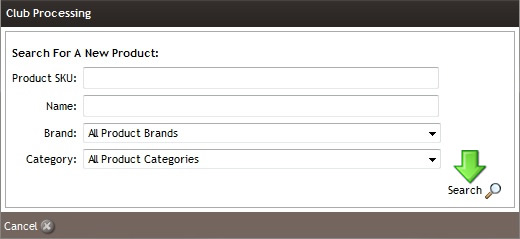
2. This will open a popup window where you can search for specific products by SKU, Name, Brand, and Category. If you want to browse all of your products, you can click the 'Search' button without entering any information.
3. select a wine you wish to add by entering the price you would like to charge, entering the quantity, and clicking the green [+] icon next to the wine.
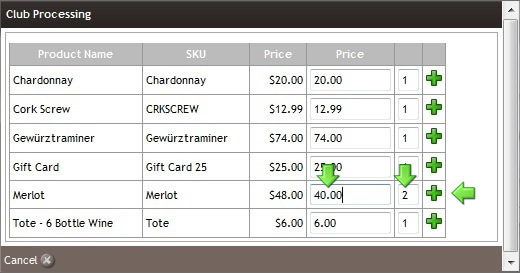
4. Complete adding all the products to the shipment. If you need to readjust any prices or quantities after adding a product, click the red X icon to remove the product and re-add it with the correct information.
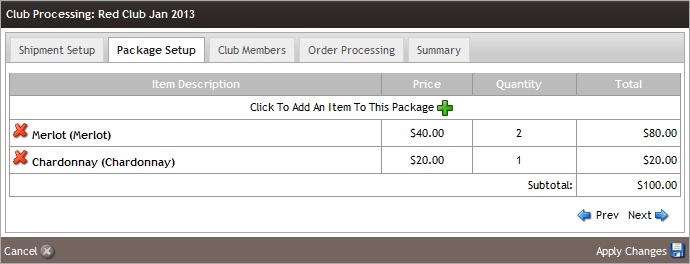
5. Once your products, quantities, and prices have been adjusted, click Next to move to the Club Members tab.
Step 4: Club Members
The Club Members tab is where you can add the club members who qualify for your club shipment. You can also review who has been processed and declined and search through the member's list.
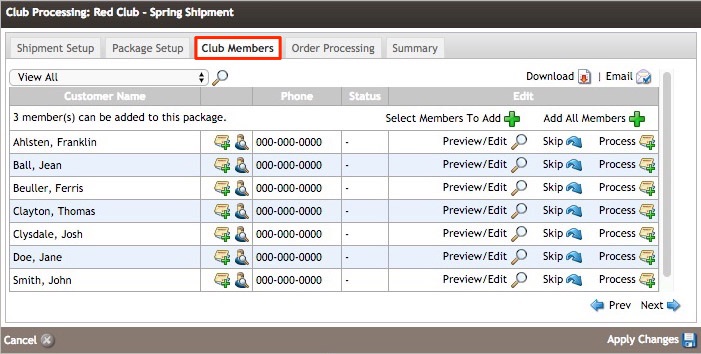
 This icon allows you to edit the credit card attached to a members club membership. This will allow you to update those members with expired cards quickly.
 This icon will take you directly to a club member's contact record under the Contacts section of the admin panel. * To navigate back to the Club Members tab, click the 'Backspace' key on your keyboard.
 Preview/Edit - This icon lets you preview each club member's order before processing your shipment. This also allows you to place custom one-off orders for an individual club member. For more information, please see the Editing A Club Shipment Documentation.
 Skip - This icon allows you to skip members you do not want to process. Skipped members will not have an order processed.
 Unskip - An 'Unskip' icon will appear next to members that have been skipped. You must click the 'UnSkip' Icon before processing the member again.
 Process - This icon allows you to process a single order for a club member. This can be useful if you are working to update members who have declined orders. You may wish to address each order individually rather than re-attempt all of the declined members.
 Download - This icon allows you to download either a full or filtered XLS file of the club members within the club processing shipment. For example, this may be useful if you want to download a list of your recently declined club members.
 Email - The email option allows you to email the members that make up this club shipment. You can email the members pre-processing and include tags such as //ClubBlob// to remind them to review and update their shipping address. You can also email members post-process, such as contacting declined members within the shipment.
Select the email category your email document belongs to, the Document itself, a Send To group, and select if you'd like to Exclude Skipped Members.

- All Club Members In Package
- All Active Club Members In Package
- Processed Only
- Processed (Pickup Only)
- Processed (Ship Only)
- Skipped Only
- Declined (May Include Expires)
- Expired
- Inactive/Cancelled Memberships
- Club Memberships Removed
Adding Members to Your Shipment
When you first arrive on the club members tab, no members will be in your shipment. At the top of the Club Members tab will count how many club members qualify for your shipment based on the Qualification Date.
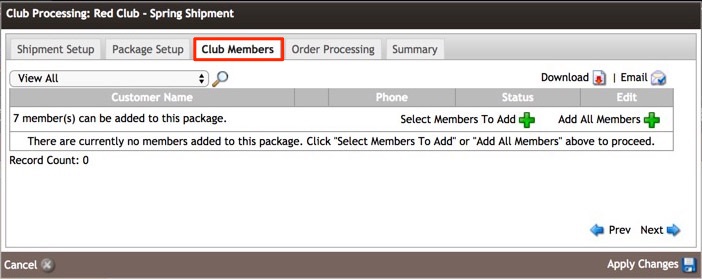
You can either add all members all at once or select individual members. (If you are working with a shipment that already has members, you can add additional members that now meet the qualification requirements set on the Shipment Setup tab).
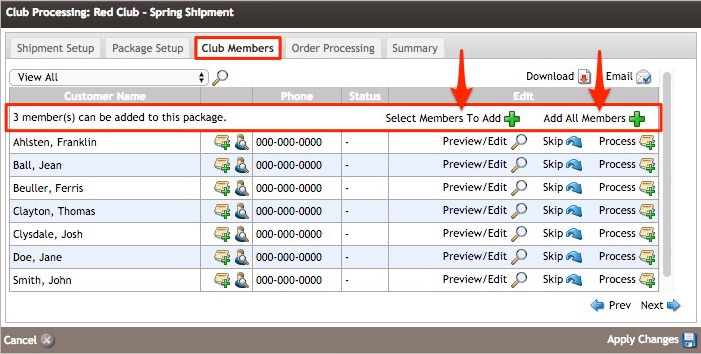
| Add All Members | To add all club members at once, click on Add All Members. |
|---|---|
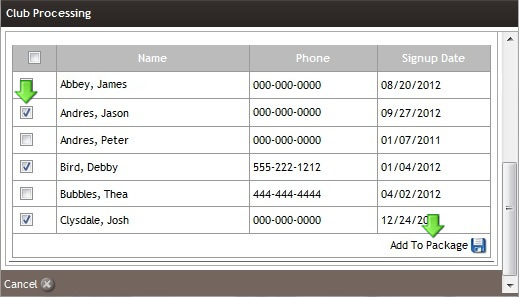
| Select Members To Add | To view each member who qualifies and select which specific members you wish to add to the shipment, click Select Members To Add. This will bring up a window where you can view and select the specific members (first 100 members) you would like to add to the shipment. To add select members, click the check box next to each member you wish to add and click Apply Changes once complete. |
Searching/Filtering Members
Once you have added members to the shipment, you can search for individuals by name or groups of customers by Status. You can click the dropdown menu to select your desired Search or filter. By default, this will be set to View All. Once you have selected from the dropdown, you must click the magnifying glass icon next to the menu to complete your search/filter.
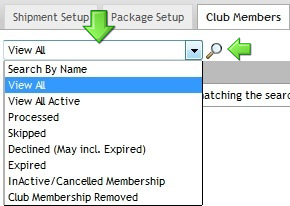
| Search By Name | This option allows you to search for members by First or Last Name. When you select Search By Name, an additional field will appear to the right of the drop drown menu where you will enter the name you are looking for. Click the magnifying glass to complete your Search.
|
|---|---|
| View All | This option allows you to view all members in the shipment regardless of status. This is the default search filter. |
| View All Active | This option allows you to view any members with active club memberships within the specific shipment you are working in. If you have canceled or placed members on Hold once they were added to the shipment (but before processing an order for them), you will filter out these members. |
| Processed | This option allows you to view all members processed in the shipment. Once a member has been processed, their Status cannot be changed from 'Processed' or removed from the package. |
| Skipped | This option allows you to view all members who have been skipped. |
Declined (May incl. Expired) | This allows you to view members whose order was declined when you processed the shipment or whose card information expired before processing. |
| Expired | This lets you view members with expired cards when adding them to the shipment. |
| Inactive/Cancelled Membership | This allows you to view members who had their membership canceled after being added to the shipment. |
| Club Membership Remove | This allows you to view members who have had their membership deleted or switched to a different club after being added to the shipment. |
Step 5: Order Processing
Once you have set up your shipment, managed your members, and previewed some of the orders for various members, you are ready to process your shipment.
To turn this feature on, go to Settings > Website Settings > Orders and check Send Initial Club Decline Email. Once turned on, the email will generate, and you can customize what is sent to your members by going to Contacts > Email Documents and editing the Club Decline system email.
Note: This feature is only available on V2.1 Email Documents. For assistance enabling this feature. Please reach out to support@winedirect.com
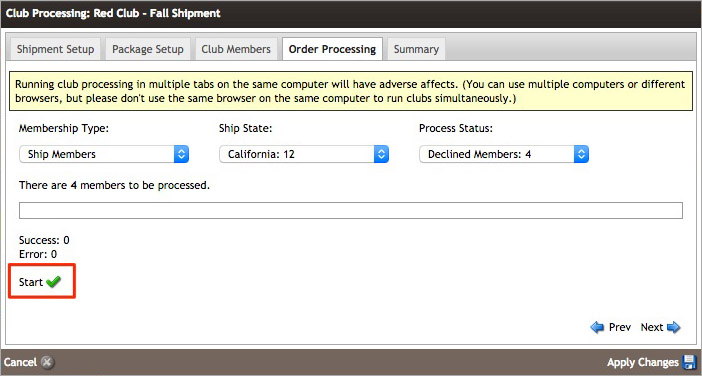
In the process tab, you will run/batch process the remaining non-processed members, creating orders in bulk. By default, the batch will set the filter selections to All Members in All States. This means your Pickup and Ship members in all states/provinces will be processed together in one batch. However, further sort options are available to break your batch into smaller groups for processing.
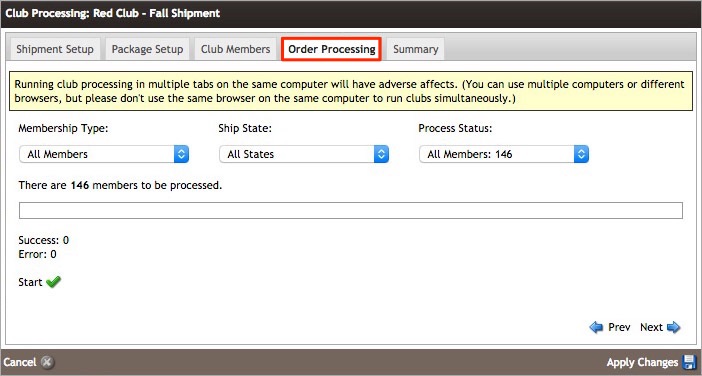
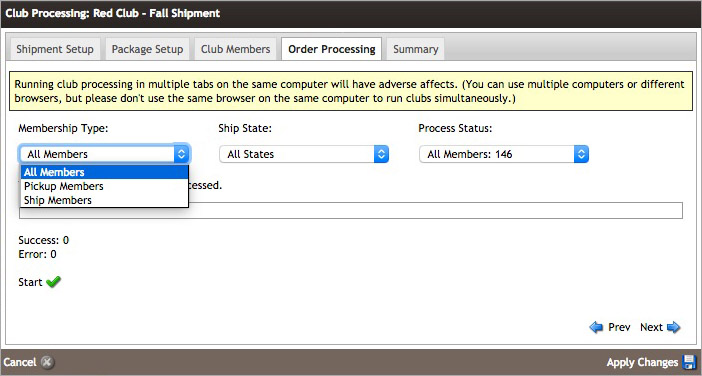
Use the Membership Type dropdown to filter Pick Members or Ship Members only. This will only batch-process your pickup or ship members, leaving the other group to be processed at another time.
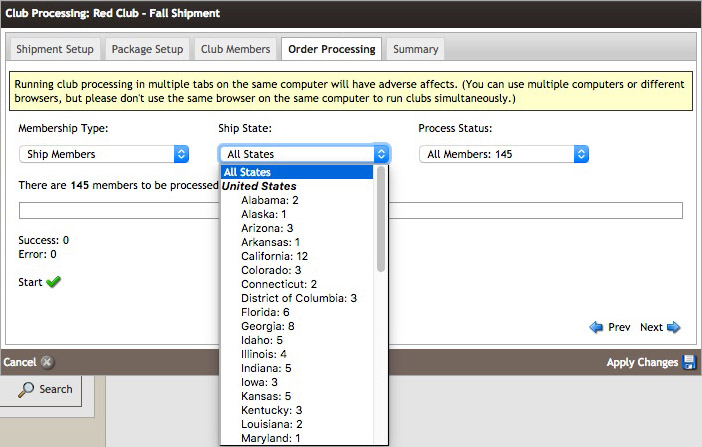
If you are shorting by Ship Members, you can filter by a specific Ship State. Each state/province will list the number of club members in the shipment that are shipping their order to that specific state.
If you have selected a specific Ship State, then the Process Status dropdown results will only update to include the members in that specific state/province.
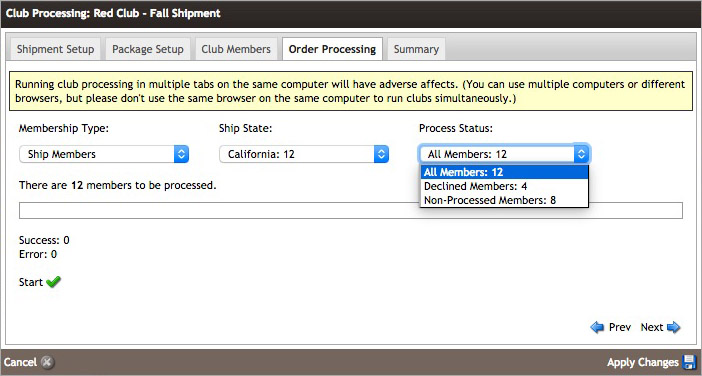
When you enter a batch for the first time, you will not have any declined orders (due to expired cards, etc.), so the Process Status of All Members will be selected by default.
If you are working with a club processing batch that you have already begun to process, you can filter between the Declined Members or only the Non-Processed Members left in the shipment. This is helpful because you do not want to attempt a declined order too many times in a row, as the multiple attempts could raise flags with the club member's credit card provider, causing the provider to reach out to the cardholder.
When you are ready to begin, click the green Start checkmark in the window's lower left.
A progress bar will let you know the Status of your batch process. If you need to cancel the process, click the Cancel icon and Resume to continue processing again.
Orders that fail to process will be marked as Error, while all successfully processed orders will record as Success.
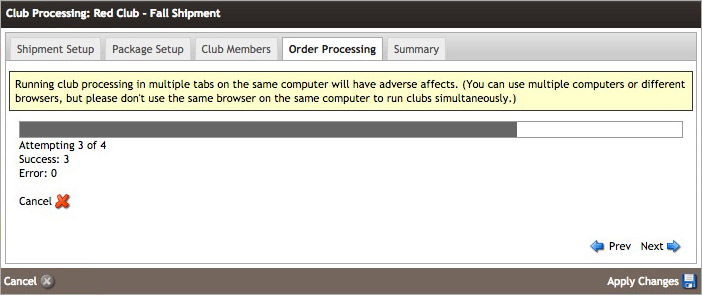
When your batch has finished processing, click Next to proceed to the Summary screen or Apply Changes to save the batch and close the window.
Step 6: Summary
The final tab of club processing, the Summary tab, allows you to view the stats for the club shipment you just processed. See the general package information (one custom order product will not show) and how many members are in the batch, processed, and declined.
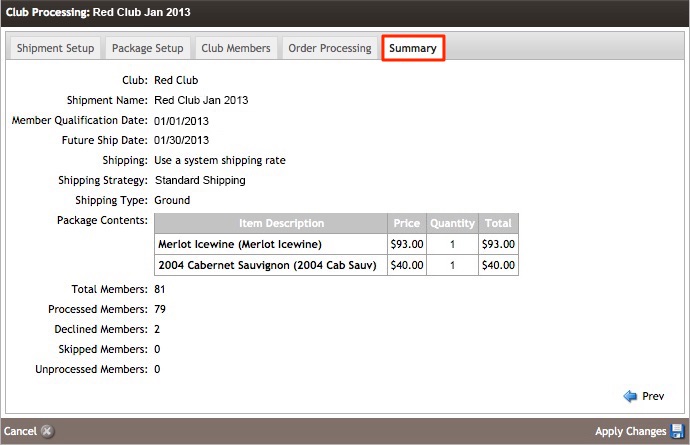
This means any user choice club will list all SKUs in the season as a quantity of 1 only, even if you have 2, 4, or more items listed as the minimum quantity to be sent to club members.
We can assure you that your customers will get the correct amounts charged and listed in the club orders for future shipping for User Choice Clubs.
To learn more about user choice clubs, click here.
SUMMARY TAB DEFINITIONS:
Club Processing - FAQs
Will my Club continue to process if I close my browser window?
No, you must leave your WineDirect browser window open for the club processing to continue.
Am I able to process my ship or pick up members separately?
Yes. On the Order Processing tab you will use the Membership Type drop down to select whether you want to only process your pick up members or only process your ship members.
Can I process ship members in a specific state/province?
Yes. On the Order Processing tab you will use the Ship State drop down to select a specific state/province that you would like to process.
Only one state can be selected at a time, if you choose to use the Ship State filter. That means you can either process all your ship members across all states/provinces or members in single state/province. Once you complete processing for one state you could always return to the Order Processing tab and process another state.
Can I retry members whose credit card was declined during processing?
Yes. On the Order Processing tab you have the option to sort the remaining un-processed members by Process Status. There are 3 Statuses:
- All Members: Both members in the shipment who have not yet been processed and members whose order were declined.
- Non-Processed Members: Only members in the shipment that have not yet had an order attempt processed.
- Declined Members: Only members in the shipment that have had their order declined.
For more information see the Order Processing section on this page. Learn More >
Can I resume a declined club order on the POS and have it update the club-processed batch?
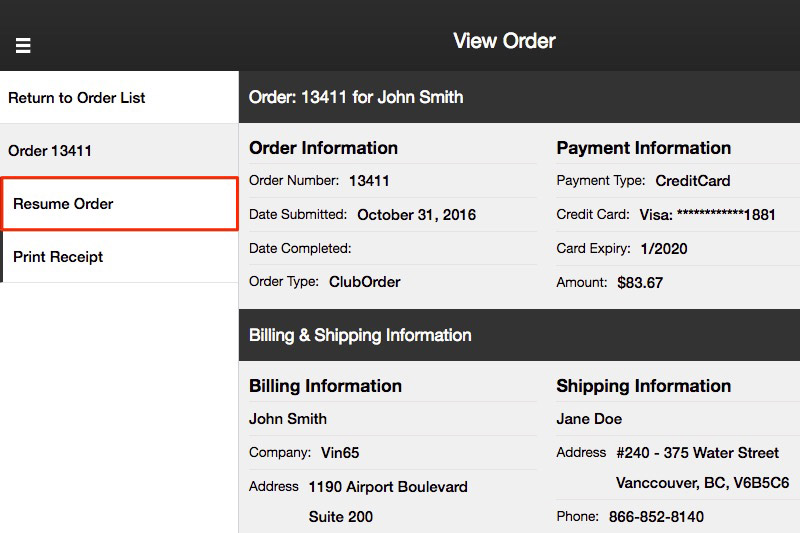
Yes. If you look up a declined order under the Order Manager section of the POS and choose to Resume a declined club order, the club processing batch that the original order was part of will be updated to reflected that the members club shipment has been processed.
Only the Resume Order ability on the POS will update the mark the declined order in the club shipment as processed, after the order has been charged successfully. Edit order through the admin panel does not update the club shipment.


