- 09 Sep 2024
- 4 Minutes to read
- Print
- DarkLight
- PDF
POS Installation
- Updated on 09 Sep 2024
- 4 Minutes to read
- Print
- DarkLight
- PDF
WineDirect POS - General Information
If you are not using our POS system just yet, you might be happy to know that our team can quickly turn on the POS for your store, with no additional cost. That is right! The POS feature is include with your WineDirect subscription plan.
You might have some costs if you do not have any hardware that is compatible with our system. WineDirect Payments is a sister-company who provideshardware for our POS. You will have to acquire that Hardware from WineDirect Payments and learn more about the installation, as well as understand how to use the POS system.
If you need some training, we have just the right thing! Access our FREE academy here.
In the Essentials section, search for POS and you will find all the first steps to making and managing sales on the POS.
There is a lot more to learn about the POS, and the very first step is to install the app. Follow the steps below for a smooth installation process.
Apple (iOS)* Installation
Downloading the app:
1. Sign up for the WineDirect POS system.
2. Go to the App Store, search for WineDirect, or click here.
3. Click the 'Free' or 'Download' icon in iTunes to download the app. You will now have the ecommerce app icon on your home screen.
Australian iOS Installation:
The POS application, by default, is set to work for North American users. Before you can log in to the POS, you must adjust the application to point to the Australian URL for the application. The following step will help you to install and adjust your application.
1. Go to the App Store, search WineDirect, or click here.
2. Click the 'Free' or 'Download' icon in iTunes to download the app. You will now have the ecommerce app icon on your home screen.

3. Locate and click on the Settings icon on your device.
4. In the settings menu, locate the ecommerce POS application icon & click on it.
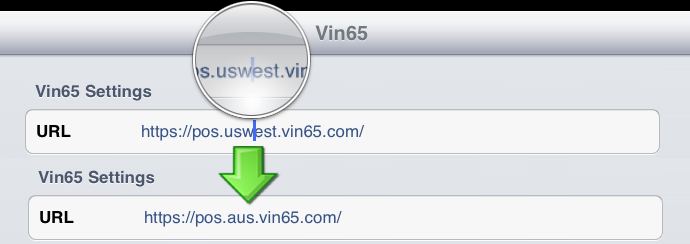
5. You should see the URL https://pos.winedirect.com.
6. Australian clients will need to add ".aus." The URL should read https://pos.aus.winedirect.com.
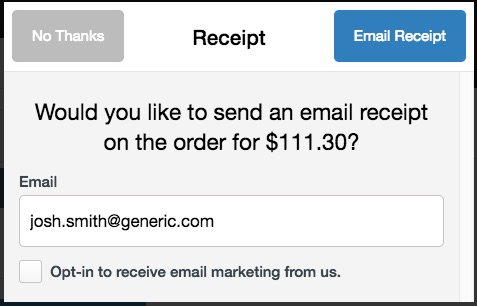
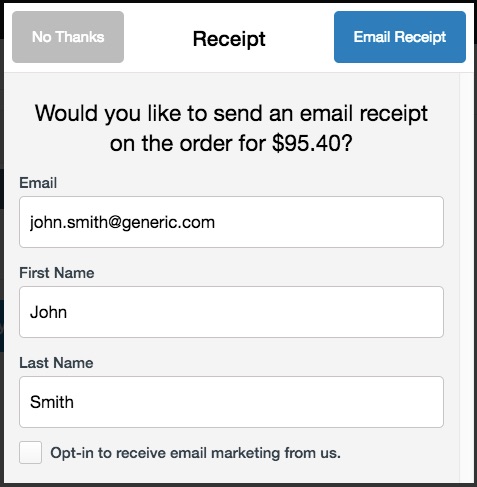
POS will now feature Opt-In to Marketing Emails
Customers who opt-in to receive marketing emails will have their contact record updated to a Single Opt-In email status. This allows you to send marketing emails to the customer. The customer will also receive an email confirming their email address, updating them to a Double Opt-in status, allowing greater compliance with newsletter mailing list standards in different countries.
Desktop Installation
Download Google Chrome
1. Sign up for the WineDirect POS system.
2. Download Google Chrome for either PC or Mac.
3. Once downloaded, open this link https://pos.vin65.com in the Google Chrome Browser.

For Australian customers, use https://pos.aus.vin65.com.

4. Save it to your desktop as a shortcut. To do this, click and hold the white piece of paper just to the left of your POS website address.
Now click and drag it to your desktop. This will save a link to your desktop, making it quickly and easily accessible.
Edit Google Chrome's Printer Settings
You will want to ensure that Google Chrome's printer settings are set up correctly before proceeding with the design of WineDirect POS on your Computer.
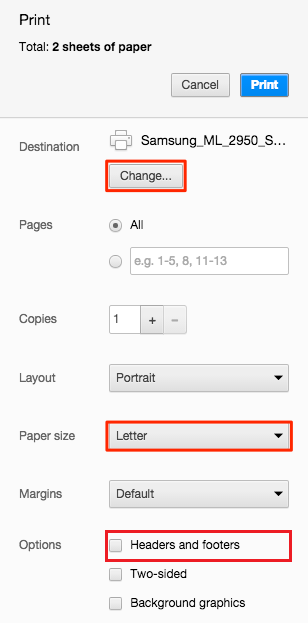
1. Open your Google Browser > click on the top right-hand menu > Choose Print
2. Here, an interface window will open up for the Printer Properties for Google Chrome. Ensure that you select the Receipt Printer that is connected to your network. You may need to press Change to change to the proper printer.
3. Click into the dropdown for the Paper Size and select 72mm x Receipt. If you are not using a supported Star Printer, you may have similar but different page size options in this dropdown window.
4. Under More Settings, uncheck any options with checkboxes for headers, footers, and background graphics.
5. Press Cancel beside the blue Print Button, and Google will remember these setting changes.
Setup a Desktop Shortcut and Kiosk Printing
You will want a desktop shortcut set up to access the POS and have everything working smoothly.
The following steps will show you how to set up a Desktop Shortcut and enable Kiosk Printing.
1. Download & install Google Chrome here: https://www.google.com/chrome
2. Check that your receipt printer is set as your default printer.
3. Launch Chrome and check that the Chrome Version is the latest.
4. On your Computer, find your Chrome program. Right-Click on it, and in the dropdown, choose to Send To > Desktop (Create Shortcut)
5. Right-Click on that new Shortcut and then choose Printer Properties.
6. A window opens up and appears on the Shortcut tab. You will see a Target field containing information. At the end of the area, add in [space]--kiosk[area]--kiosk-printing https://pos.vin65.com/#/login
7. Below is how it looks on PC.
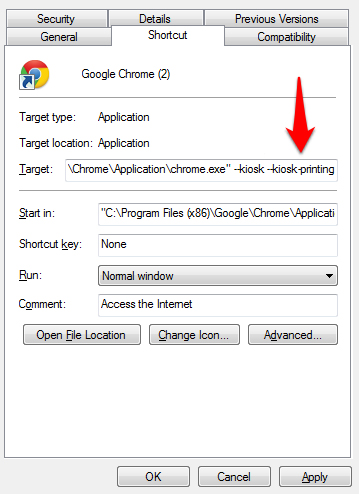
8. Kiosk mode will force Chrome into a forced fullscreen mode and allow silent print where the print dialogue popup will not appear again. It would be a good idea to rename the Chrome shortcut to WineDirect POS or something similar. When done, press Apply.
Now your Desktop Version of WineDirect POS will operate the smoothest. Just open up that Shortcut each time.
- If you need to exit kiosk mode, press the Windows key on your keyboard, and close the kiosk window from the taskbar.
- If you need to use Chrome in non-kiosk mode, you will want to create another shortcut on the desktop without the Kiosk mode tags.


