At WineDirect, we understand that your tasting room is the heart of your winery. The POS Restaurant Features allows you to start a table, hold a table, resume a table, and send tickets to a selected printer, such as a bar or a kitchen printer.
Also, with newly improved powerful features for WineDirect POS users, you will be able to streamline your operations and enhance customer satisfaction. You are now able to filter your restaurant tickets, which are organized in numerical order, and manage all created tickets from the POS to better serve your customers.
Keep reading to understand all the potential that is unlocked with our Restaurant Features.
POS Restaurant Features Setup
It is quick and easy to setup your POS Restaurant features! Also, if you are wondering about costs, POS Restaurant Features are included with your WineDirect Subscription! This means you do not pay extra to setup and use this feature, if you are already a WineDirect Ecommerce customer.
If you already use WineDirect's POS and do not see the Restaurant features in your POS, please contact support as we can quickly enable this for you.
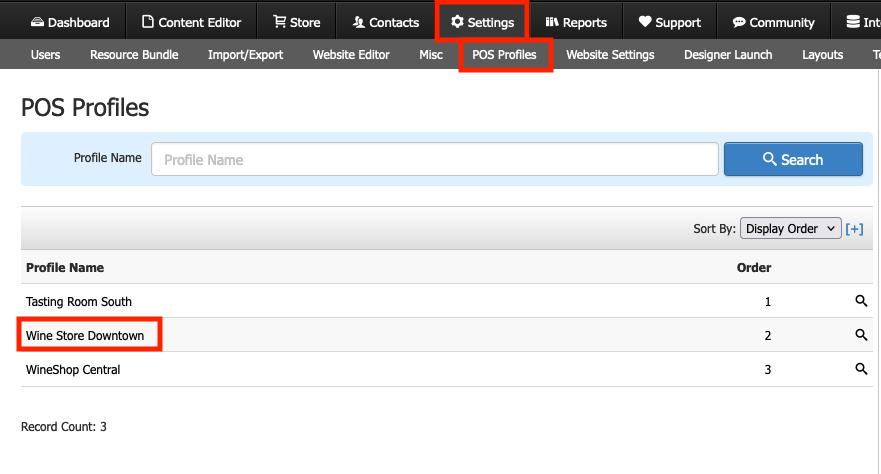
If you already have POS and Restaurant features enabled for your Ecommerce, ensure that your POS profile has the "table seating" box checked to be able to put a table on hold, manage the tickets and even re-print the order tickets! To do that follow these steps:
- Login to the WineDirect Admin Panel on the computer (ensure you are a Domain Admin or have permissions to access the POS profile section).
- Click on the Settings tab > POS Profiles > and select the POS profile you wish to edit.
- Under General Information, click the Edit button and check the box for Table Seating.
- Click Save.
If you already have the "table seating" box checked on your POS profile, the new improved features are already available to you now!
New Improved Restaurant Features
When getting a new customer in your Tasting room, it is good to understand each of the steps you and your staff must take to create their order and ensure that they will get their order in a timely manner. First, you or the tasting room staff will start a table for that customer, then add items to that table. You can also hold the table, resume the table and send the table's order ticket to print so that kitchen or bar staff can get started on their order.
Now with the improved features, it has become even easier to manage tickets, and we are happy to say we heard your feedback and you can now print the order tickets as many times as you need in case the ticket gets misplaced for whatever reason.
Improved Ticket Organization
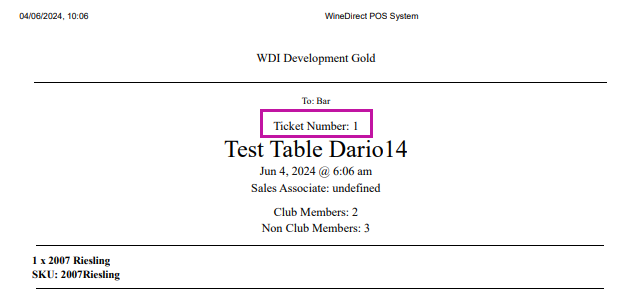
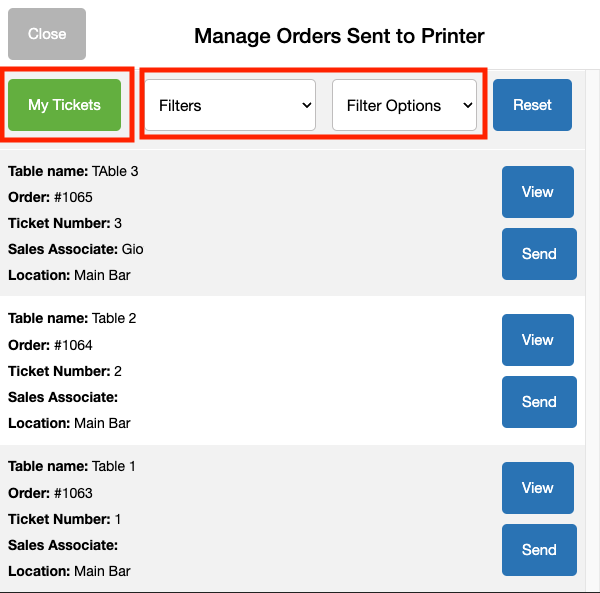
With our new improved features, you will say goodbye to ticket confusion with our numerical ticket organization system. Each receipt ticket now includes a unique "Ticket Number" value, enhancing visibility and facilitating tracking of orders. All tickets will have their ticket number on top of the name for that table. The ticket numbers will go up to 100 and then the counting starts over from 1.
Easily Manage and Re-print Order Tickets
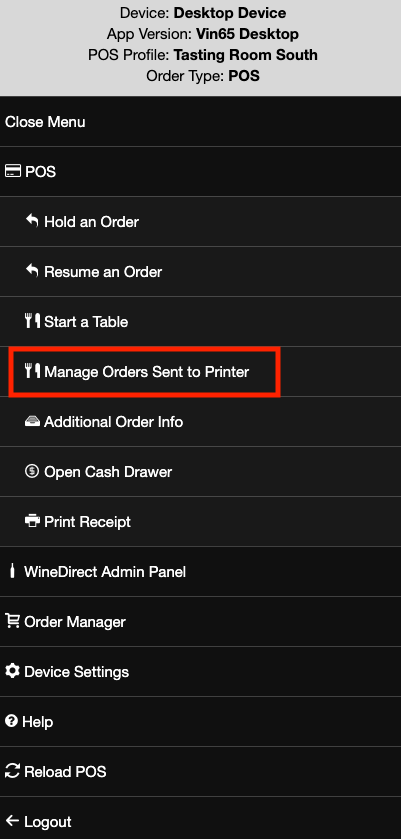
With the new "Manage Orders Sent to Printer" button, handling table orders has never been easier. Simply tap this button on the POS menu to open a window to preview all generated tickets. The Manage Orders Sent to Printer feature will only show table orders created on that same day. Order ticket numbers do NOT reset daily. Ticket numbers will starts from the next number after the last order ticket number, until they reach 100, and then the ticket number will reset to 1.
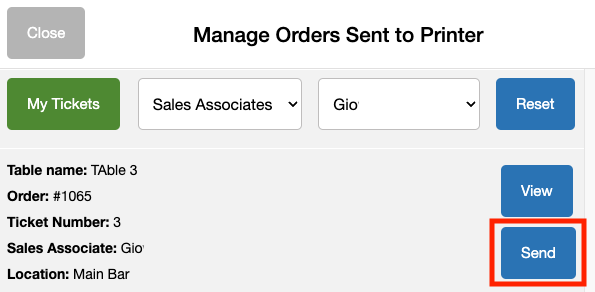
From the Manage Kitchen Receipts window you can select any ticket you need to be re-printed and sent to the kitchen or bar area. Just click on the SEND next to that order ticket, see below:
New Ticket Filters
We know how hectic things at the tasting room can be! We heard you and now you can easily find and access the right tickets, quickly. The "My Tickets" button allows staff to view only their orders by default. Staff can go to Manage Kitchen Receipts to find the "My tickets" if they are logged on to the POS in their personal profile.
If staff is not logged on to the POS, but have set the sales associate for that table, they can use the new filters drop-down menus to find the order tickets by sales associate or location. To clear the search all you have to do is click on Reset.
Start a Table
Follow the steps to learn how to start a new table:
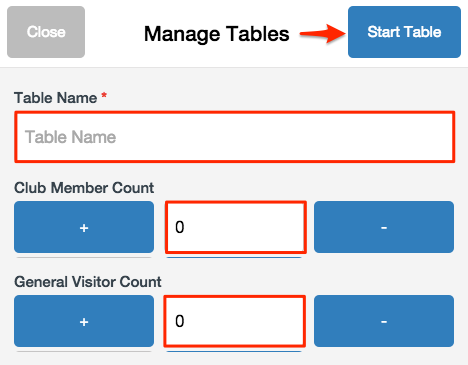
1. From the POS menu, select Start a Table.
2. In the Manage Tables window, give your table a Table Name, and use either the [+] and [-] buttons, or type in the number, to input the Club Member Count and the General Visitor Count.
**Do not input special characters into Table Name; otherwise receipt will generate an error and be unable to print.
3. Click Start Table.
Add Items to a Table
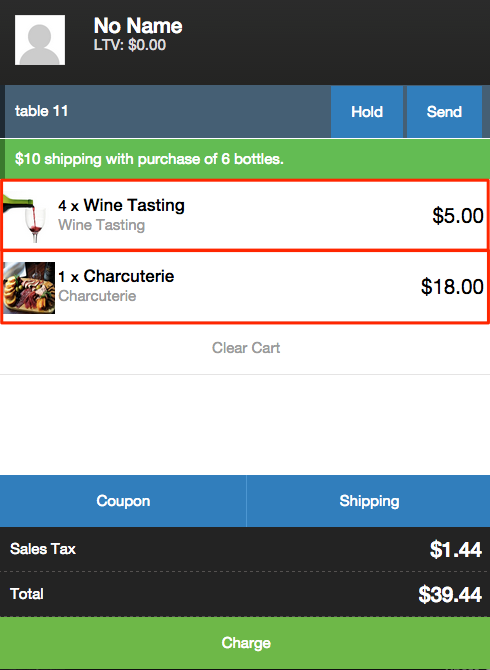
Adding items to a table is the same process as adding items to a cart for checkout customers. After a table has been started, you can follow the steps to learn how to add items to a table:
1. Through the product menu selection, choose an item and the appropriate quantities you wish to add to your table.
2. The items will appear in the right-hand Cart menu once selected.
Hold a Table
Follow the steps to learn how to hold a table that you have started:
1. From the right-hand Cart menu, select the Hold button.

2. The items and quantities within the table will be placed on hold until you are ready to resume the table.
Resume a Table
Resuming a table is the same process as continuing an order. Follow the steps to learn how to continue or remove a table that has been placed on hold:
1. From the POS Menu, select Resume an Order.
2. In the Resume Order window, there will be a listing of Open Tables and their Sales Associates.
3. Find the Table Name you wish to reopen, and click Resume.
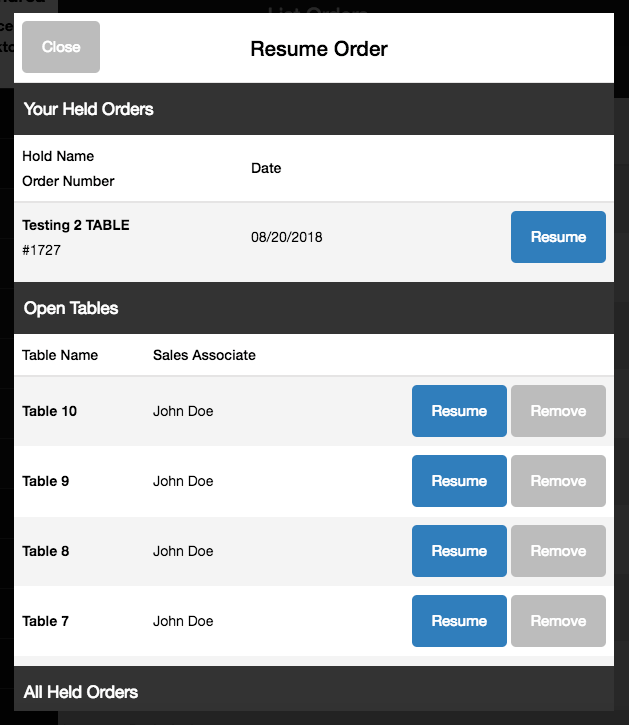
4. The table will now appear in the right-hand Cart menu for you to continue with.
5. Alternatively, you can remove the table by clicking Remove next to the desired Table Name in the Resume Order window.
Send Items to a Printer
When sending items to a printer, you can send selected items to specified printers. For example, you may want to send food items to a kitchen or prep area printer and wine items to a tasting room printer. Follow the steps to learn how to send items from a table to a printer:
1. Review the order to ensure the correct items and quantities are in place.
2. Click Send in the right-hand Cart menu
3. In the Send To window, select the Prep Area, Printer, Products, and any Notes about the order you wish to send.
4. Click Send to print the selected items.
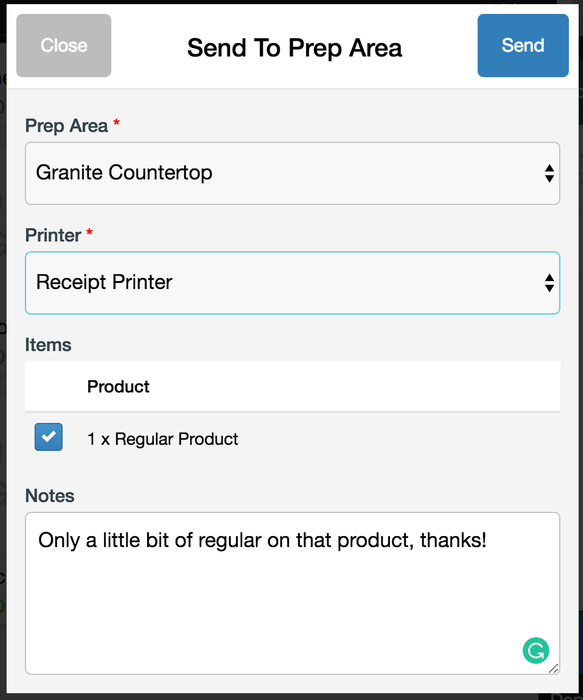
5. If you wish to send any remaining items to a different printer, follow the steps above. Any items not yet sent to a printer will remain in the Send To window.
Items may only be sent to a printer if they are still in the cart, have not been charged, and have not already been sent to a printer. If you set the table's order, the table will be closed out. Additional orders will need to be placed under a new table.