Forms can be used for various purposes, from gathering contact information to allowing customers to submit questions. The following video and text will assist you in creating and modifying a form.
Creating A Form
1. Go to Content Editor > Components > Forms.
2. Click on the green Add A Form [+] button.
3. The General Information section is the first section you will arrive at. Here you can adjust the essential information for your Form, including form name, who will receive notice that the Form has been filled out and whether a contact record will be created for a contact who completes the Form. Typically you would want to:
- Add the form name.
- Enter an email address to receive the responses.
- Check Is Tied To Contact.
Click Save.
4. If you have selected Is Tied To Contact, the Subscription Settings section will allow you to add a mailing list opt-in or Unsubscribe capability to the Form you are creating. If the Form you are building does not need either of these settings, carry on to step 5.
5. The Form Questions section is where you will add additional form fields such as First and Last name, address, or custom questions like "How did you hear about us?" or "What is your favorite type of wine?". Click + Add Question to add a new question and Save to save it.
6. The Thank You Message section allows you to enter a short message that will appear in place of the Form once the customer has completed filling it out and submitting it. We suggest always having a thank you message so customers know their form results have been sent successfully.
7. The Automatic Email Response section allows you to set up an optional automatic follow-up email that will automatically be sent to the contact after they complete the Form.
Remember to use the Edit button to access each section you wish to adjust and the Save button to save any changes.
General Information
In the General Information section, you will adjust who will receive notifications once a form has been filled out and whether the Form will create or update a customer record for the customer filling out the Form. Some basic form sizing and formatting adjustments can also be made.
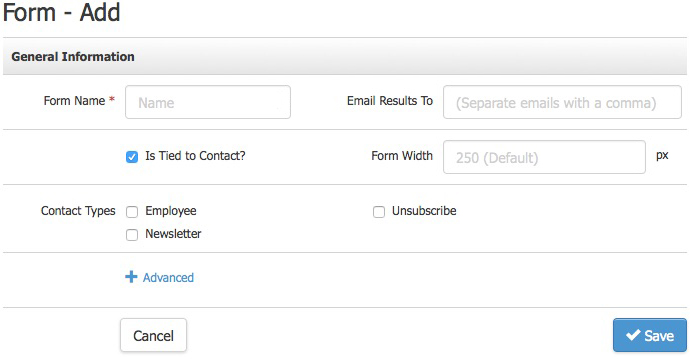
| Form Name | The name of your Form. The form name will appear at the top of your Form when placed on the website. |
|---|---|
| Email Results To | Enter the email addresses of the people that you want to receive the results of these forms (For example, info@abc.com,support@abc.com) |
| Is Tied To Contact | This is a multi-purpose field. First and foremost, it adds an email address field to your Form, allowing you to create or update a contact record for the person completing the Form. We suggest that every Form has this option checked off so that you collect contact information for follow-up. Second, you can auto-assign the contact that completes the Form to a Contact Type for future reference. After checking this box, a list of available contact types will appear. Third, by including the email address in your Form, you gain access to the mailing list opt-in or unsubscribe under the Subscription Settings section. |
| Form Width | Adjust the overall width of the form box. Additional sizing options for question field width, etc., are available under the Advanced settings section. |
Advanced Settings
Advanced form settings can be accessed by clicking [+] Advanced.
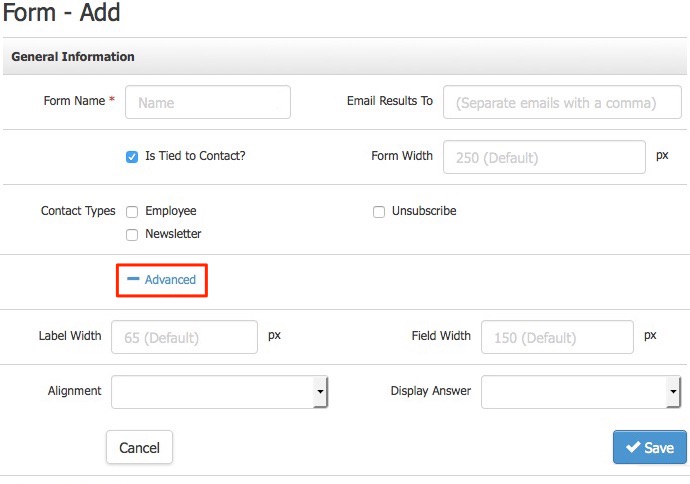
| Label Width | The width of the form field label text (i.e., Email, Name, and custom questions text). |
|---|---|
| Field Width | The width of the fields for your Form. |
| Alignment | Select your Form's alignment with other text around the Form on the page you place it on.
|
| Display Answer | Adjust where |
Subscription Settings
The Subscription Settings section allows you to add the ability for customers to opt-in to receive marketing emails or the ability to unsubscribe from such marketing emails.
| Show Opt-In Checkbox | Allows you to enable a mailing list opt-in checkbox to your Form.
Contacts that complete the Form and check the opt-in box will automatically be assigned the Single Opt-In email status. A double opt-in email will automatically be sent after the Form has been completed to the contact so that they can double opt into the mailing list giving you long-term marketing email privileges to that contact. |
|---|---|
| Unsubscribe Contact on Submit | Allows you to automatically update the customer's email status to Unsubscribe by completing the Form. An unsubscribe form is not required for a contact to unsubscribe from receiving marketing emails. |

The questions section allows you to add the various form fields and questions you want the contact to fill out.
1. To add a new question/field click + Add Question.
2. Next, either select one of the present fields and click Save to save the Question.
or
3. For custom form questions, do not select a preset field, instead, select Question Type, enter the Question, and add any additional multiple-choice responses if you selected a multiple-choice question. Click Save to save your Question.
4. Continue adding questions, remembering to click Save after each until you have completed adding all your questions.
Preset Fields
If you check the Is Tied To Contact option under the General Information section, you can choose from several Preset Fields that will populate a contact record with the information the contact enters.
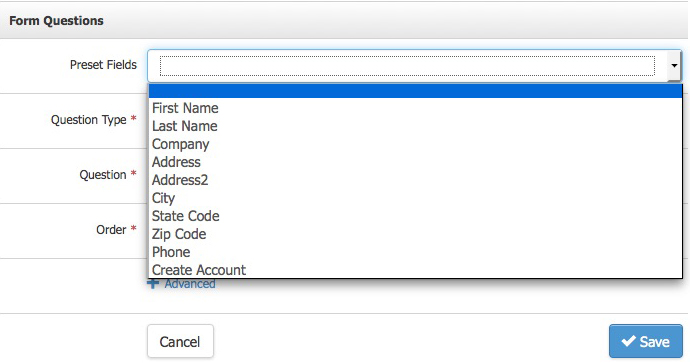
| First Name | Contact's first name |
|---|---|
| Last Name | Contact's surname. |
| Company | The company the contact is associated with. |
| Address | The address of the contact. |
| Address 2 | Additional address information. I.e., unit number, floor number, etc. |
| City | The city the contact resides in. |
| State Code | State or Province of the contact. |
| ZipCode | The zip or postal code of the contact. |
| Phone | Contact's main telephone number. |
| Create Account | Allow contacts to create a username and password to log into your website. This can be used in place of the standard Create Account page that already exists by default. |
Question Types
Enter the Question text under the Question field and then select one of the Question Types to select which response method you want the contact to use for your Question.
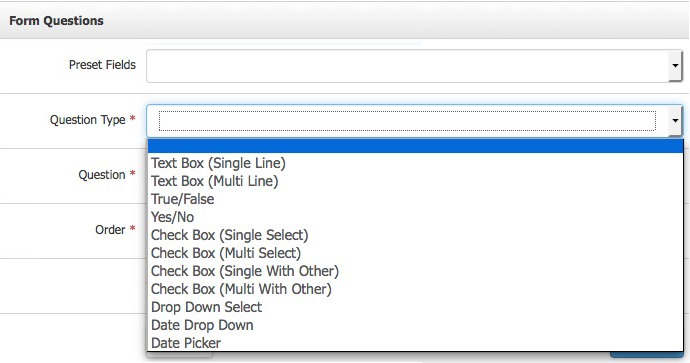
| Text Box (Single Line) | A question field with a single text box for a contact to enter an answer. Ideal for short answers of a word or more. |
|---|---|
| Text Box (Multi Line) | A question field with a multi-line text box where a contact can enter a body of text, i.e., a comments field. |
| True/False | A question with True or False as the only selectable answer. |
| Yes/No | A question with Yes or No as the only selectable answer. |
| Check Box (Single Select) | A question where the contact can select one answer from several custom responses you create. |
| Check Box (Multi-Select) | A question where the contact can select multiple answers from several custom responses you create. |
| Check Box (Single With Other) | A question where the contact can select one answer from several custom responses you create or select Other and enter an alternative response. |
| Check Box (Multi With Other) | A question where the contact can select multiple answers from several custom responses you create and select Other and enter an alternative response. |
| Drop Down Select | A question where the contact can select a response from a drop-down select. |
| Date Drop Down | Allows the contact to select a date from the drop-down menu. |
| Date Picker | Allows the contact to select a date from a calendar select. |
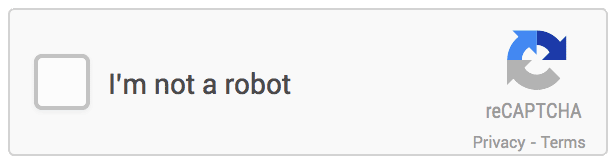
| Google reCAPTCHA | Allows you to reduce spam form submissions using Google's reCAPTCHA tool, specifically designed to allow human form submissions but prevent spambots from submitting forms on your website. Selecting this question type will add a required reCAPTCHA box at the bottom of the Form that a person must fill out. In most cases, this is as simple as checking the box or selecting images from the reCAPTCHA box to confirm that the person is not a spambot.
|
| Is Required | Are the questions required to complete the Form? Select yes or no. |
| Order | You can also choose the order in which your questions are displayed on the Form (and change this order later if you like). |
Thank You Message
Please enter the text that you want to display after they have completed the Form.
For example: Thank you for taking the time to fill out our Form. It helps us get to know you better, so we can provide the best experience possible. Cheers!
Automatic Email Response
You can choose to send an email upon form completion by selecting the category (email folder) you wish to use for the email. You can find out how to create email categories/documents by visiting the Email Documents page.
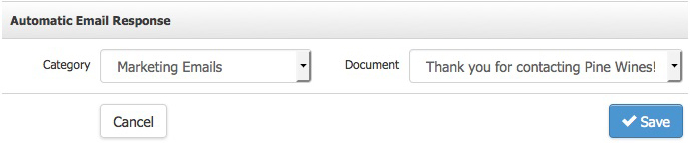
1. Select the Category that the email document is stored under.
2. From the Document field that appears, select the email that you want to send out.
3. Click Save.
Adding A Form Component
1. Go to Content Editor > select the page you want to have your Form placed on
2. Click on the Insert Component button (which looks like a little gear icon) and choose the Form you want to add to the webpage.

3. Click OK and Save Page.
Form Builder FAQs
- Can an upload tool be added to a form?
- How do I edit the checkout, club signup, profile, etc. forms (that aren't in the form builder list)?
- Why are my clients receiving two emails when they fill out my Form?
- I'm getting spam form results; how can I stop this?
Can an upload tool be added to a form?
No, at this time no upload tools can be added to the form builder. (i.e. upload photos, pictures, documents, videos, etc.). We suggest you add a note either above/below the form, or in the 'thank you' comments to have the user email you the item you'd like.
How do I edit the checkout, club signup, profile, etc. forms (that aren't in the form builder list)?
There are specific forms that are generated by WineDirect's tools and are 'system' forms. These forms can't be edited (i.e. the checkout form can not be changed).
Specifically on the 'Edit Profile' form, you can add or remove the list of Contact Types that show there. If you'd like a contact type to be added/show on the list, you need to check off the Is Public checkbox. If it's not checked, it will not show on the list. For more info about contact types, see the Contact Types page.
Why are my clients receiving two emails when they fill out my Form?
The form most likely has Opt into mailing list selected, as well as an Automatic Email Response set up. This would send the client the system generated Email Confirmation email, as well as whichever ever document you had set up within the Automatic Email Response section of the form.
I'm getting spam form results; how can I stop this?
The majority of spam comes from spam bots looking for forms to complete with their spam submissions. To help eliminate spambot submissions use the Google reCAPTCHA question type on your form.
Selecting this question type will include a required recaptcha box at the bottom of the form that a person must fill out. In most cases this is as simple as checking the box, or selecting images from the recaptcha box to confirm that the person is not a spambot.
Please note that while recaptcha will help prevent spambots from filling out your forms, it cannot prevent humans with nothing better to do than to post spam on your site. So while this will greatly reduce spam entries, you may still receive the occasional spam result from a human user.
See the Form Questions Documentation for more information on adding Google reCAPTCHA to your forms.