- 20 Dec 2024
- 4 Minutes to read
- Print
- DarkLight
- PDF
How to Setup Click to Cancel for WineDirect Wine clubs
- Updated on 20 Dec 2024
- 4 Minutes to read
- Print
- DarkLight
- PDF
The Federal Trade Commission (FTC - USA) has introduced a new rule amendment requiring businesses to provide consumers with easy and accessible cancellation methods for all subscriptions. This regulation states that customers must be able to cancel subscriptions with the same simplicity they experienced when signing up. This impacts wine club subscriptions and any other subscription of services/products offered by wineries.
What are the Requirements?
Businesses offering online subscription signups (e.g., wine club memberships), must offer an equivalent “Click-to-Cancel” mechanism for cancellations. This eliminates unnecessary steps and prevents the use of customer retention tactics during the cancellation process.
For additional details, refer to the FTC’s official ruling page here.
Customer Experience - Seamless Cancellation
After setting up the click to cancel process below, when a member logs into their account, the “Club Cancellation Request” option will appear in the account navigation. This allows club members to cancel their subscription directly without navigating through unnecessary steps.
How to Setup your Click-to-Cancel Process
To make this easier for wineries and to comply with this ruling, we created a step-by-step guide on how to implement a new page and form that complies with this rule. This form will organize the cancellation requests for staff to manually cancel club subscriptions weekly.
1. Create a new Content Editor page - “Club Cancellation Request”
Go to Content Editor > General Pages > Site Pages > Under Homepage > find the green Add Page > Click on Add a Page > Name the Page Title “Club Cancellation Request” (or a similar name of your preference) > Click on Save Page.
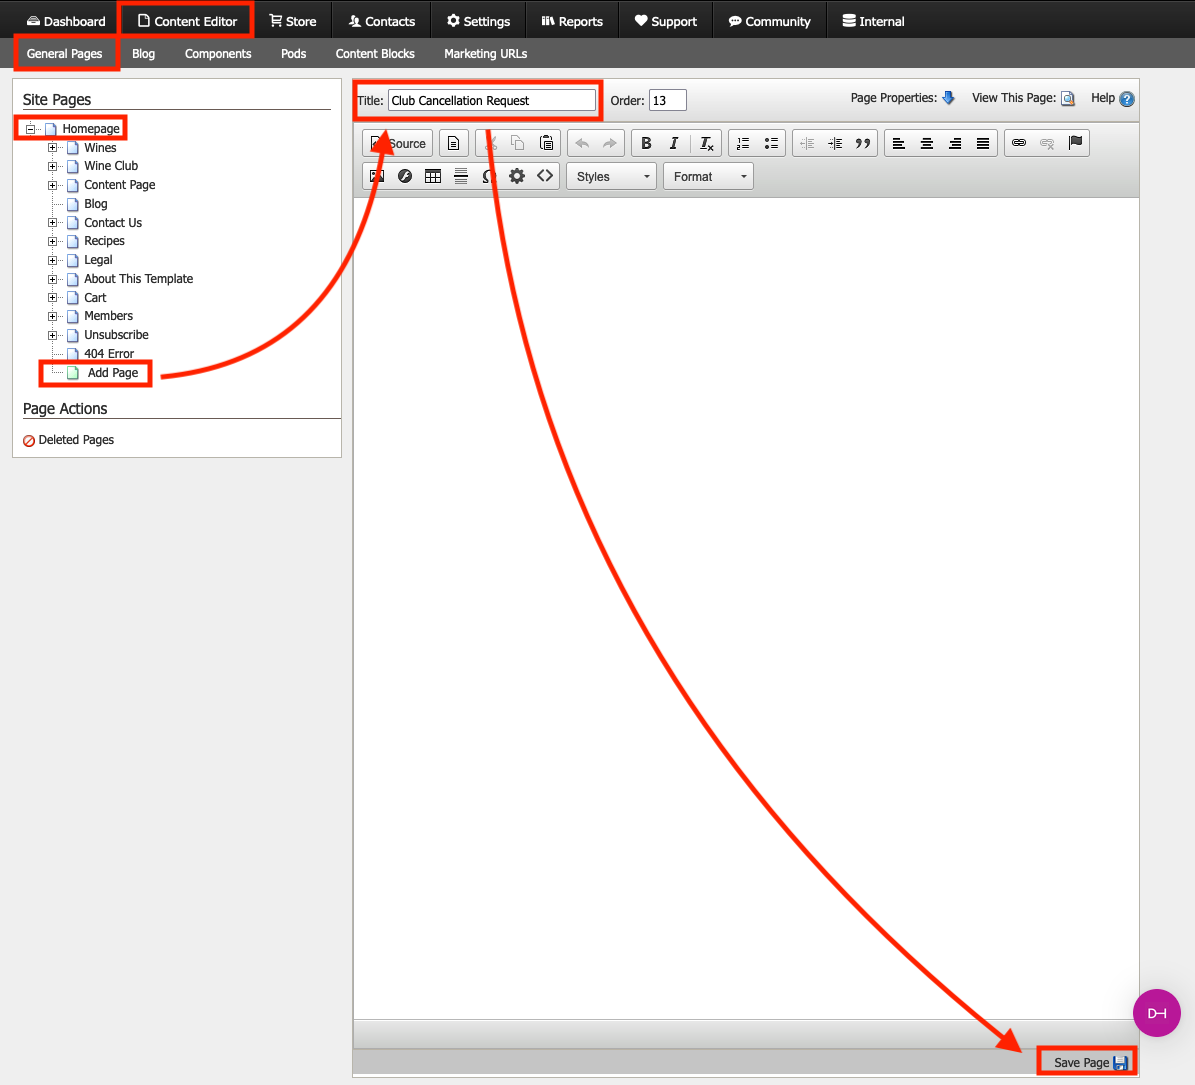
This new Cancellation page must be created from the Homepage as a main page and then assigned to the parent Members page. This ensures the page is accessible from the customer’s account navigation.
To ensure you created the page in the correct location, after saving the page, go to Page Properties.
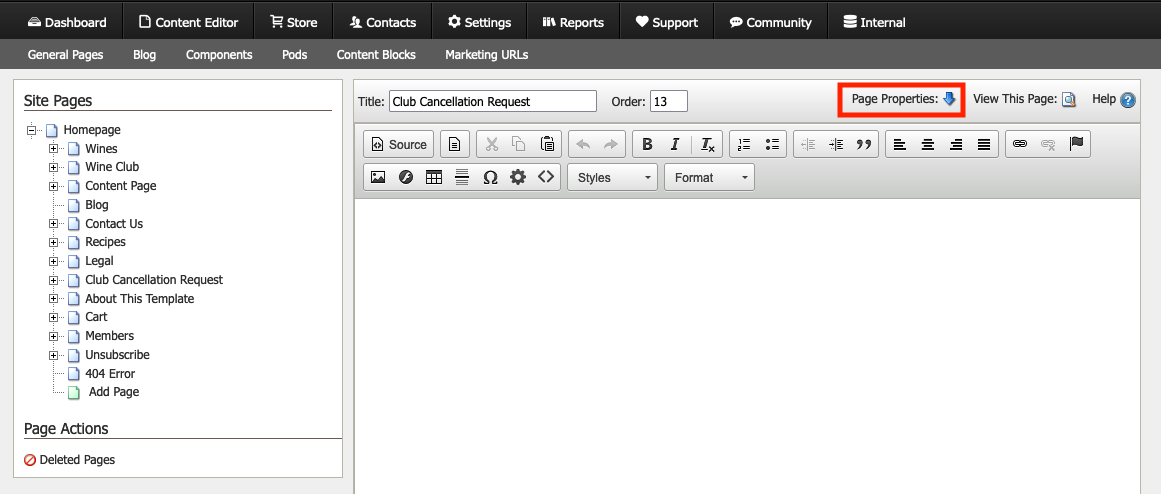
If the Parent Page shows Homepage and this new page is listed under the Homepage, like all other main pages, this is correct.
.png)
2. Make this page a subpage of “Members” page via Page Properties
On the Club Cancellation Request page > go to Page Properties > Click on the green pencil > Click on the Members parent page > Click on Apply Changes > Go to the bottom of the page and click Save Page.
.png)
.png)
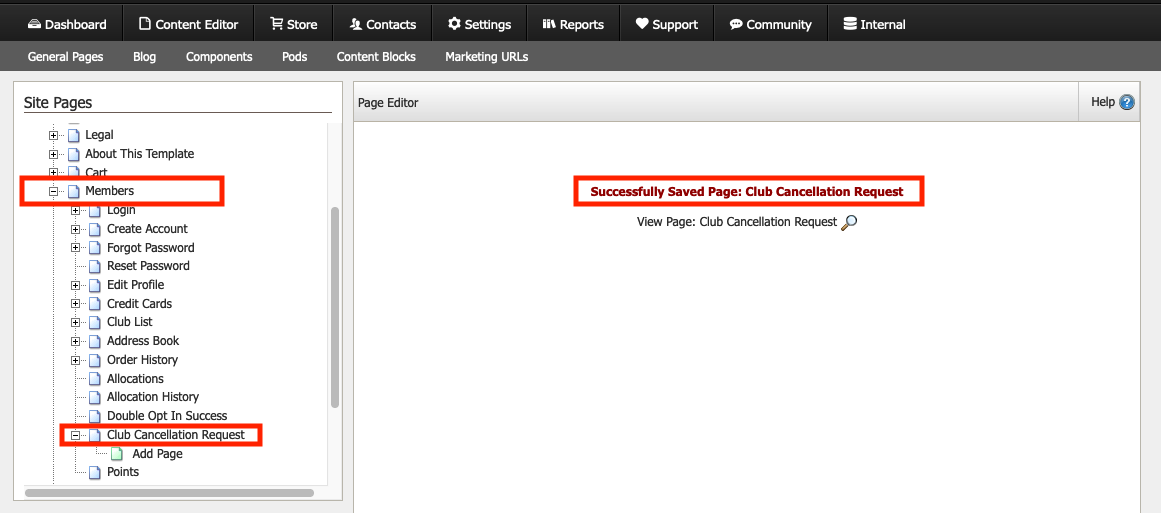
Clicking on "save page" will ensure the page moves from a main page under Homepage, to being under the Members parent page. You should always click on "Save Page" after any changes you make to ensure the changes are saved. You will see a message saying "Successfully Saved Page: Club Cancellation Request" and the page will be showing under the Members page.
3. Build a Cancellation Form
In the Admin Panel, Go to Content Editor > Components > Forms > Add a Form > Create a cancellation form.
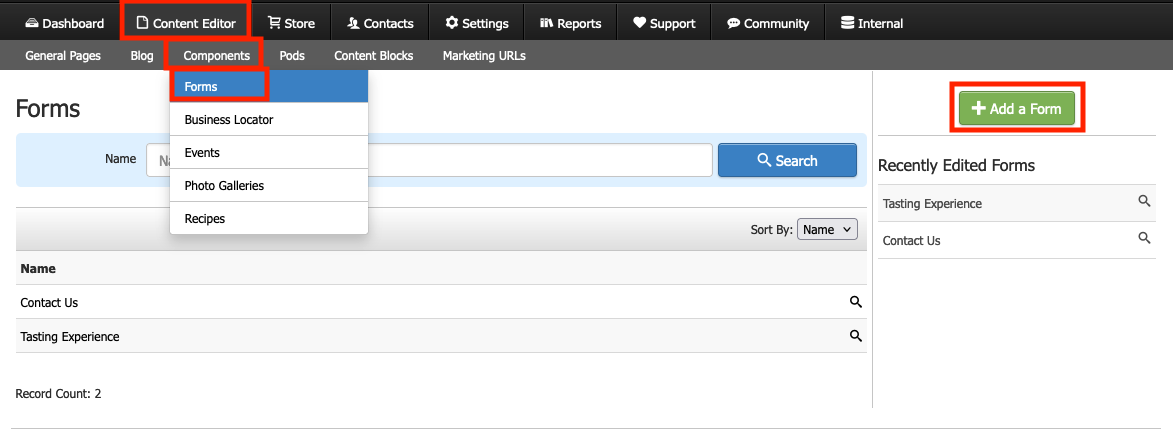
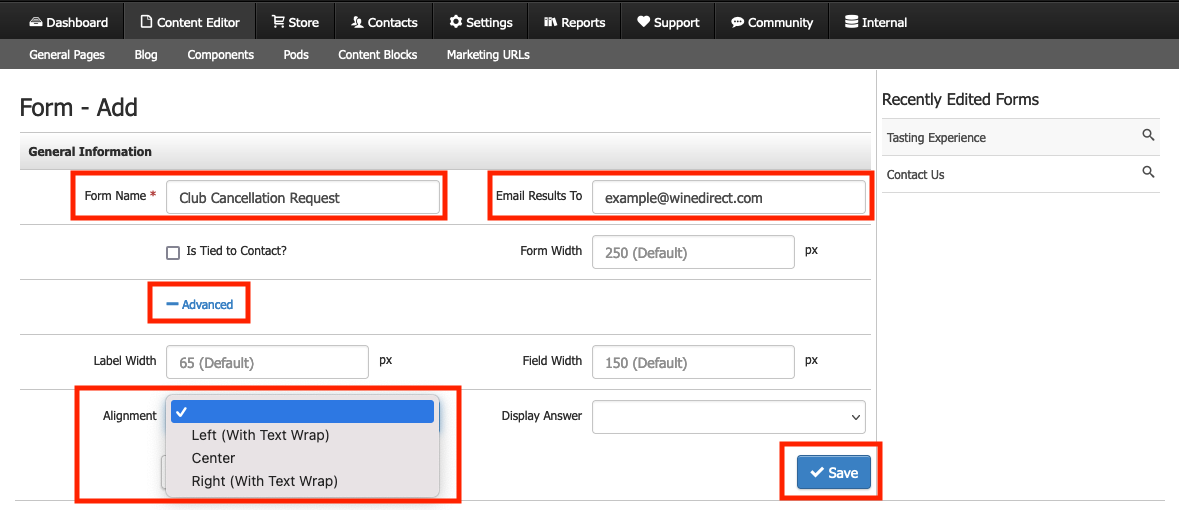
Fill in the Form Name and the best email to receive the cancellation requests > Click Advanced > Under Alignment Select "left, center or right" depending on how you want the form to show on your webpage > Click Save.
As a best practice, we recommend that the email on "Email Results to" be an email that is checked daily, from Monday to Friday, and that is not attached to one single staff member. Creating a new email might be the best avenue; e.g. "cancellations@wineryxyz.com" which can be forwarded to many staff members for better visibility of cancellation requests.
After saving the form, you will need to create the questions to get the customer information for the cancellation. In the new screen, click on Add Question:

We recommend that your form have at least 3 questions:
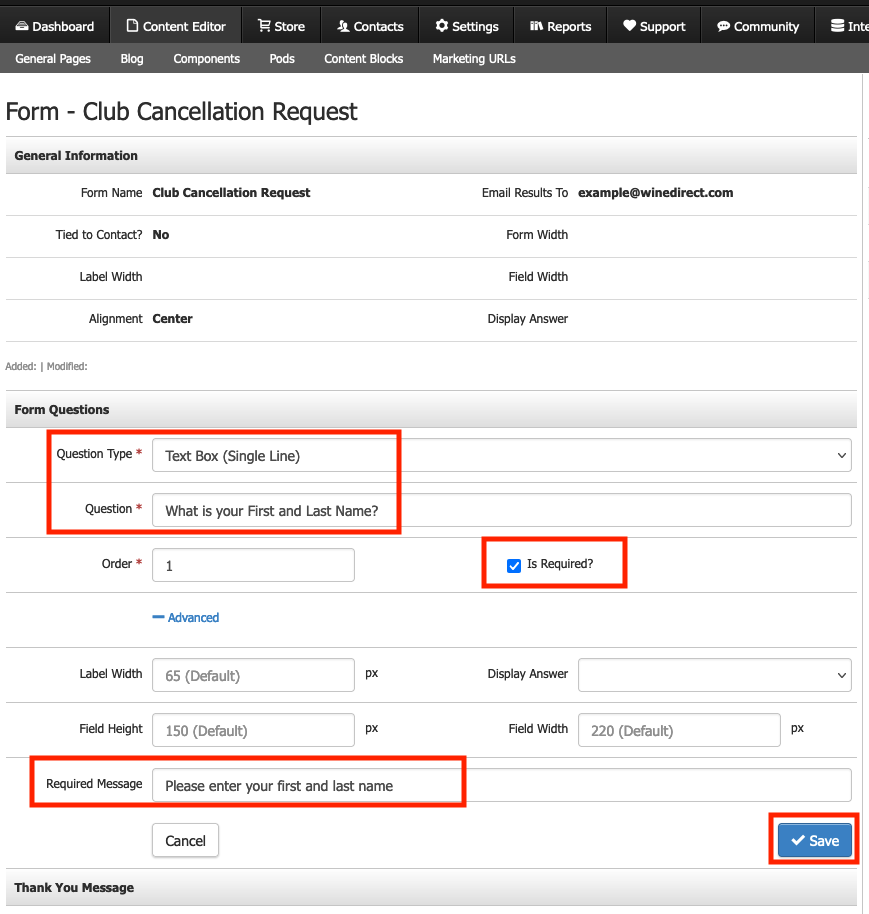
- First and last name
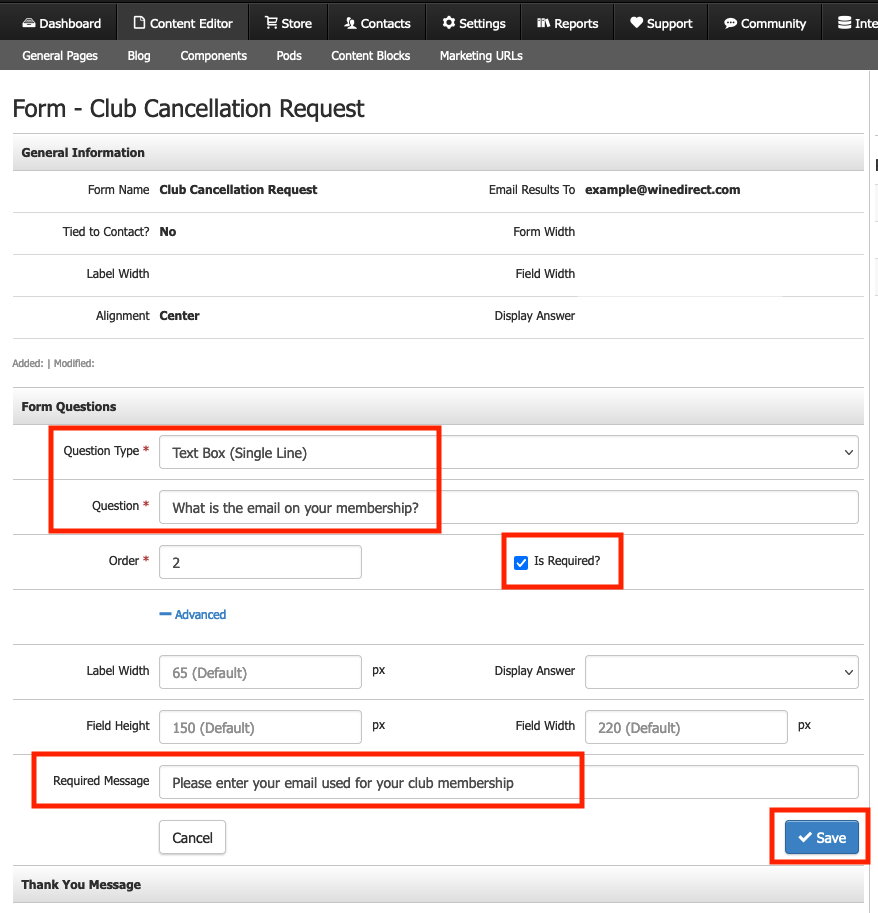
- Email address associated with club membership
- A list of Clubs
Create First and last name Question:
Create Email address associated with club membership Question
Create a list of Clubs Selection:
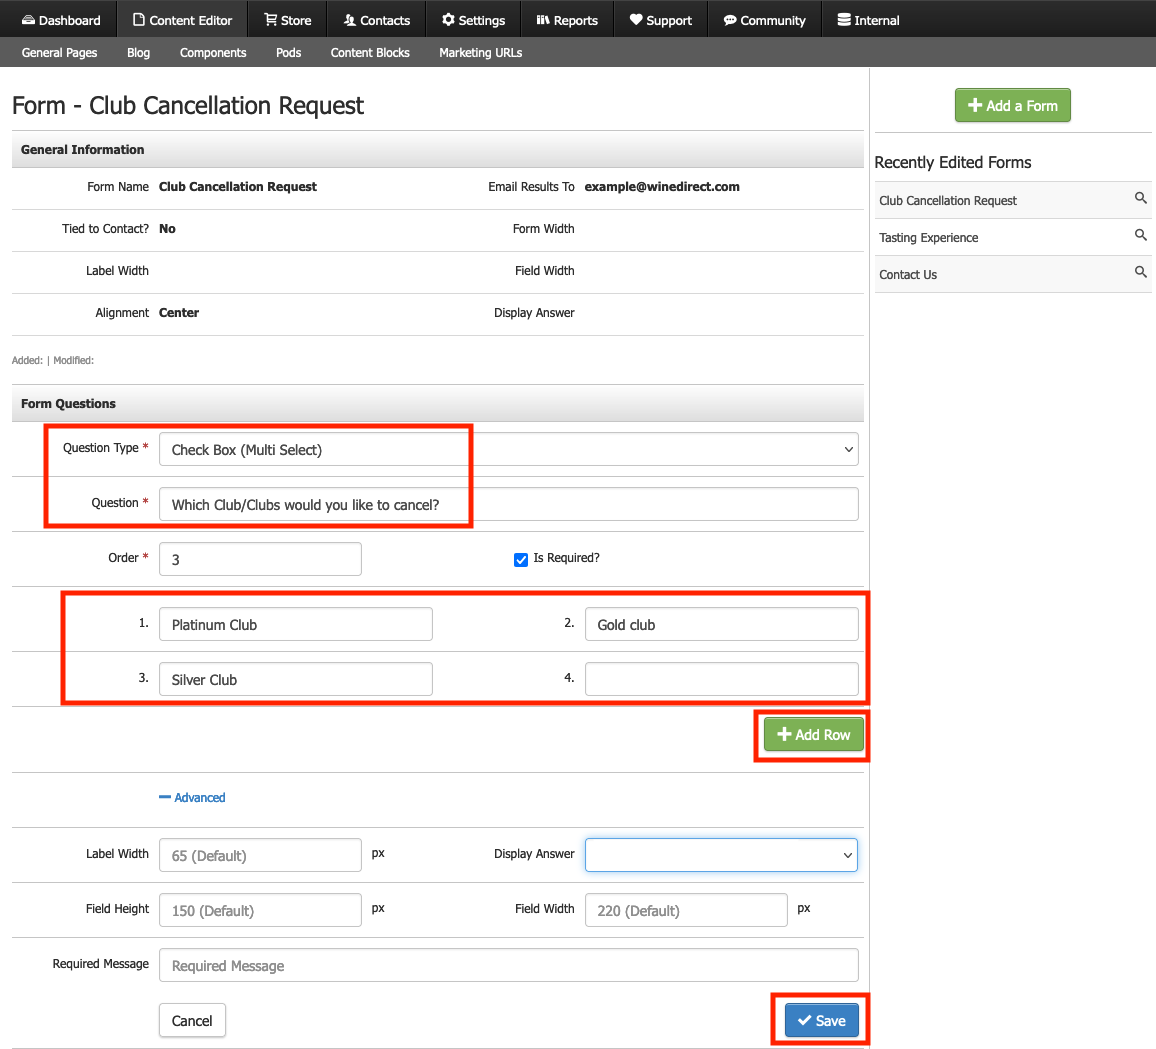
You can add as many questions as you want or need to your new form. You can also add a Thank you Message to this form. By the end of creating the question, your form should look something like this internally:
.png)
Once this is completed, you will need to add this form to the"Club Cancellation Request" page created in Step 1.
4. Adding form to the "Club Cancellation Request"
Go back to Content Editor > General Pages > Click on + next to Members to see the subpages.
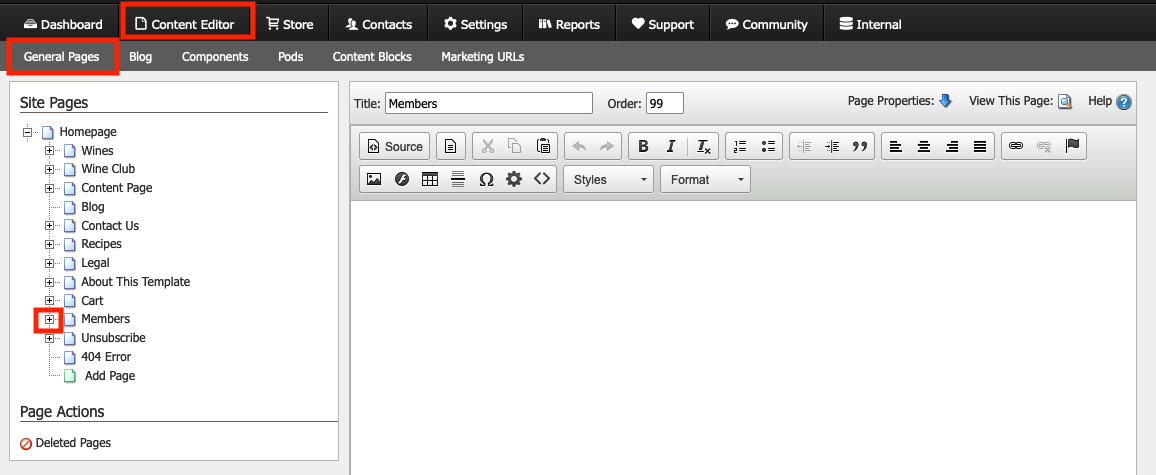
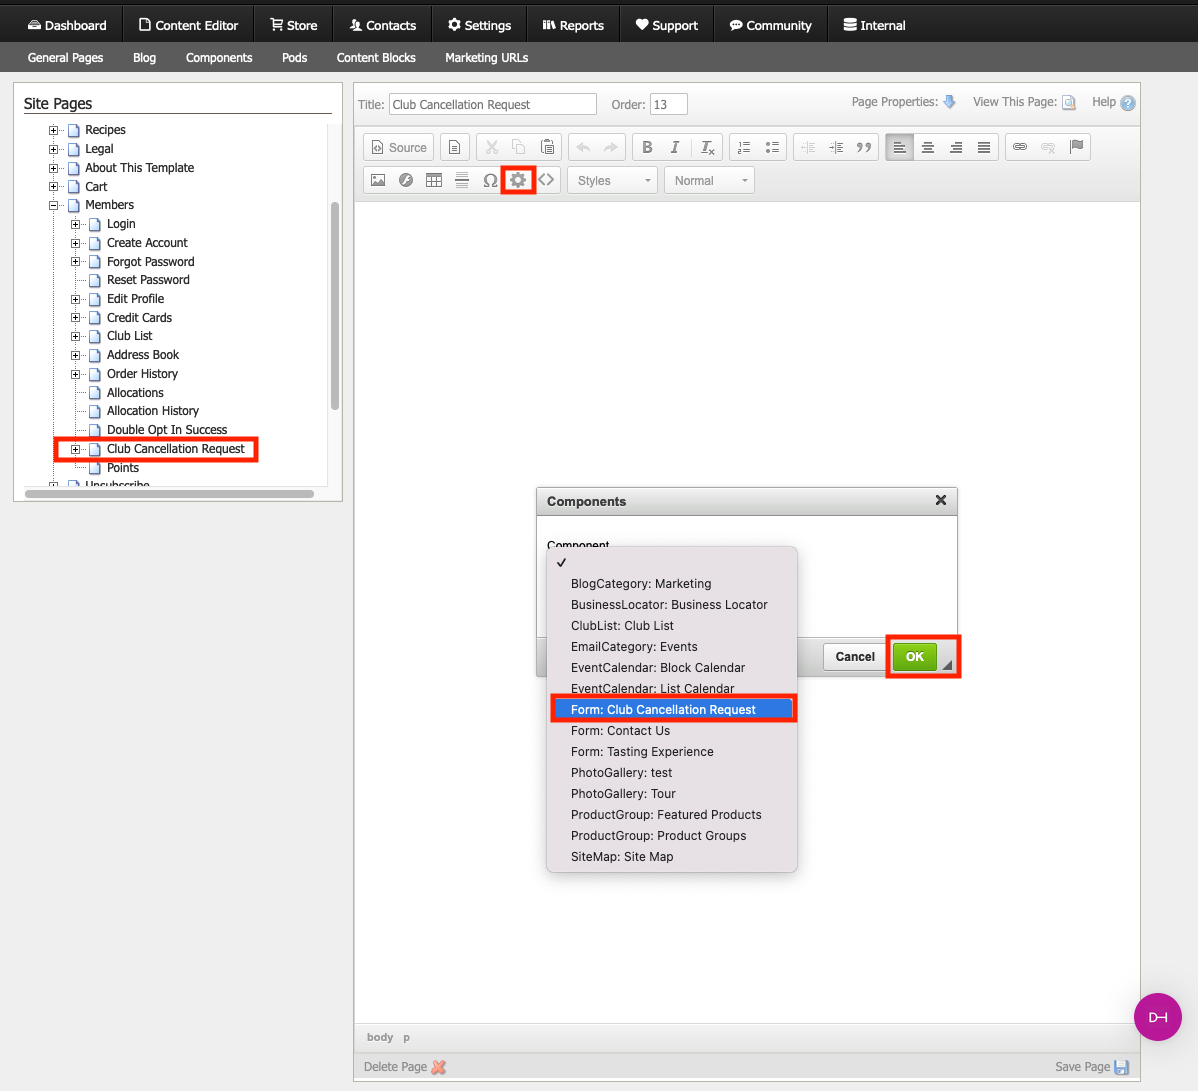
Click on "Club Cancellation Request" > Click on the cogwheel > the component popup will open > Select "Form: Club Cancellation Request" > Click OK.
You will see a text saying [[Club Cancellation Request:Component: XXXXXXXXXXX]], this means you successfully added the component. Click Save Page. After the page is saved, come back to this page and click on view page to ensure the form is correct.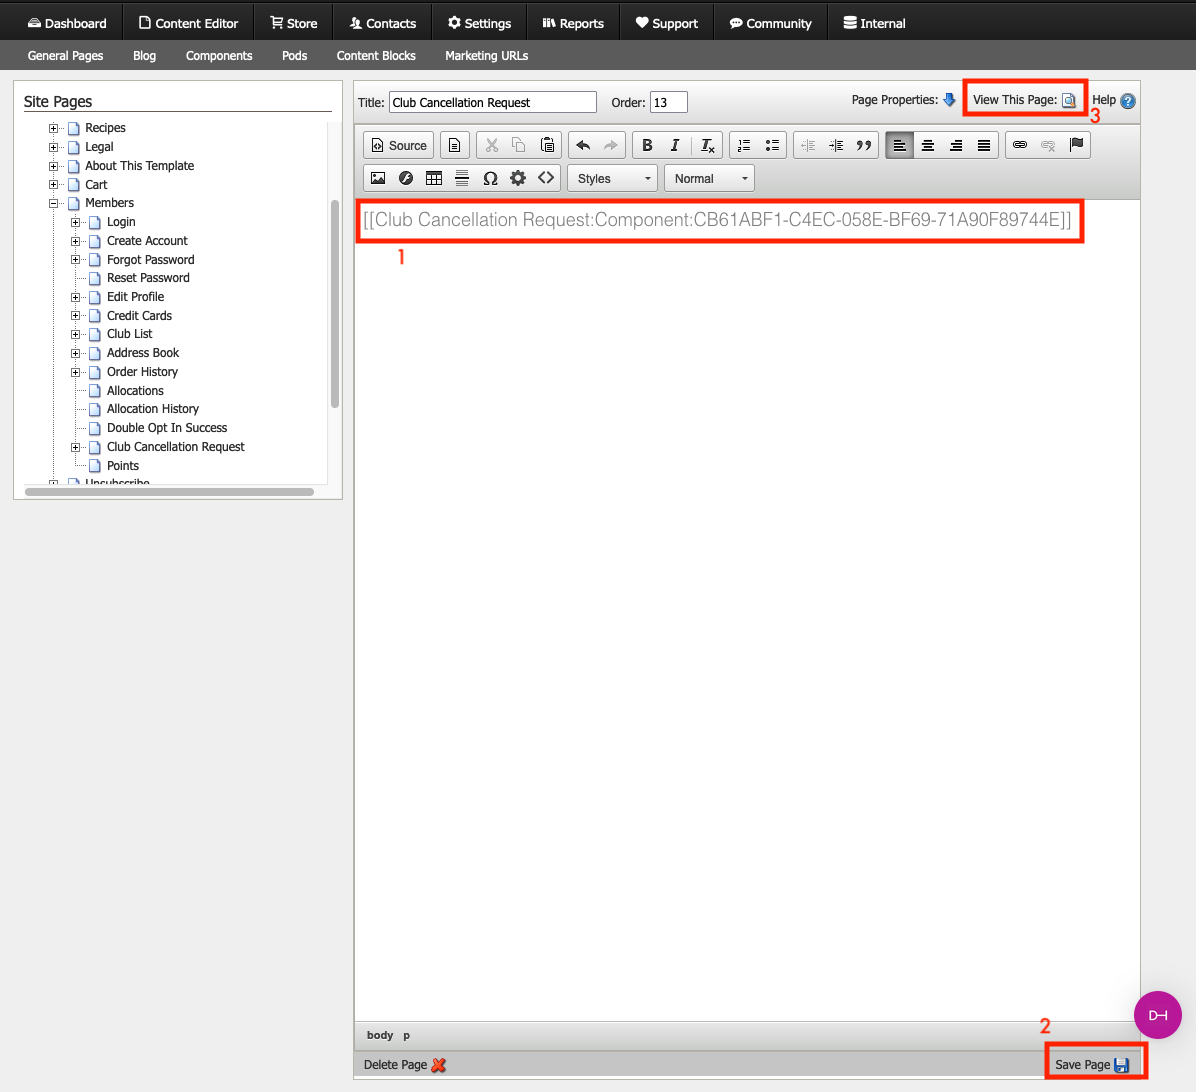
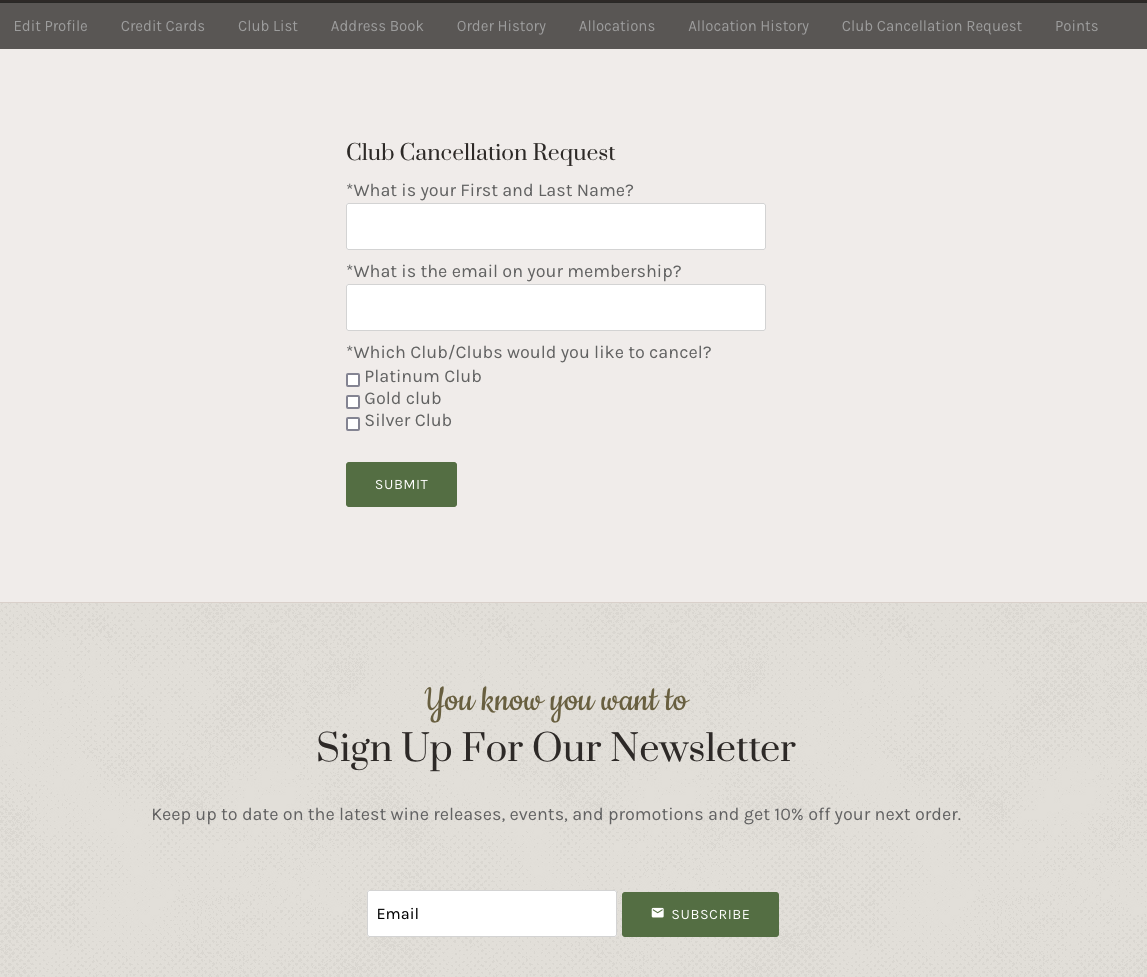
You should see something that respects the design of your website; similar to this:
5. Process the Cancellation
After receiving the cancellation request, staff will need to manually cancel the membership in the Admin Panel.
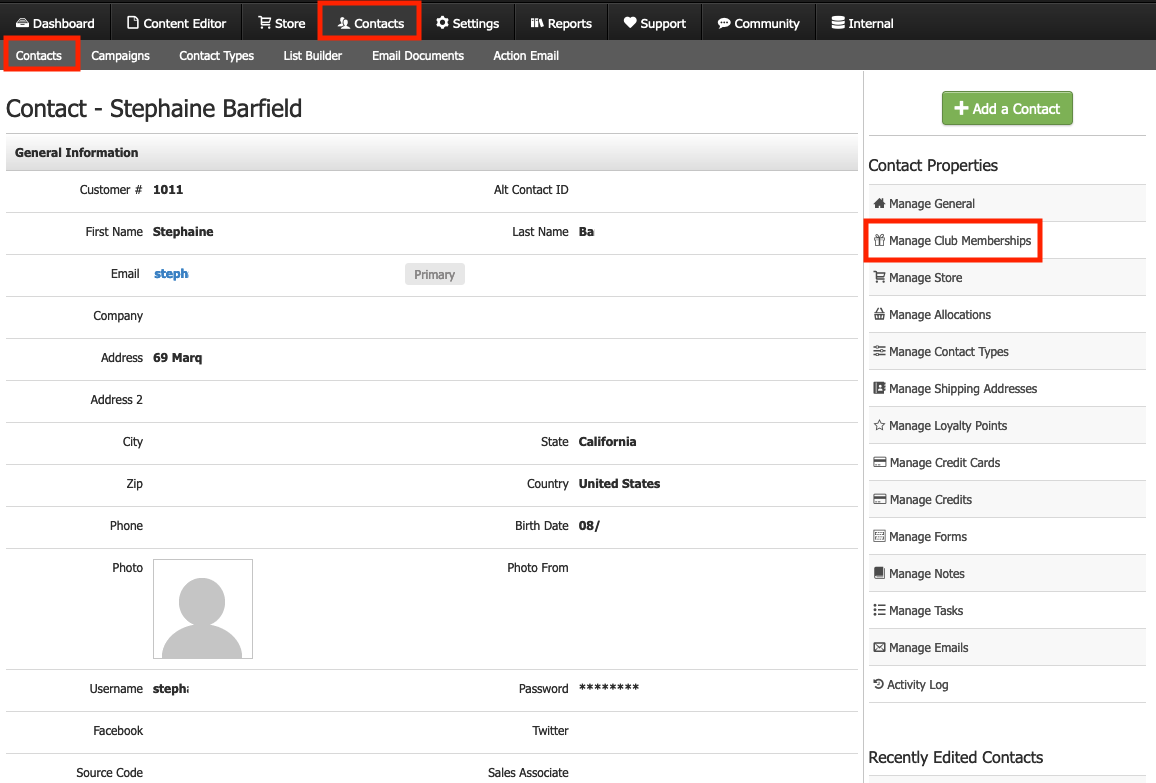
Go to the Contact profile for that customer > Right-side menu click on "Manage Club Memberships":
Click on the Club name under membership > Click EDIT.
.png)
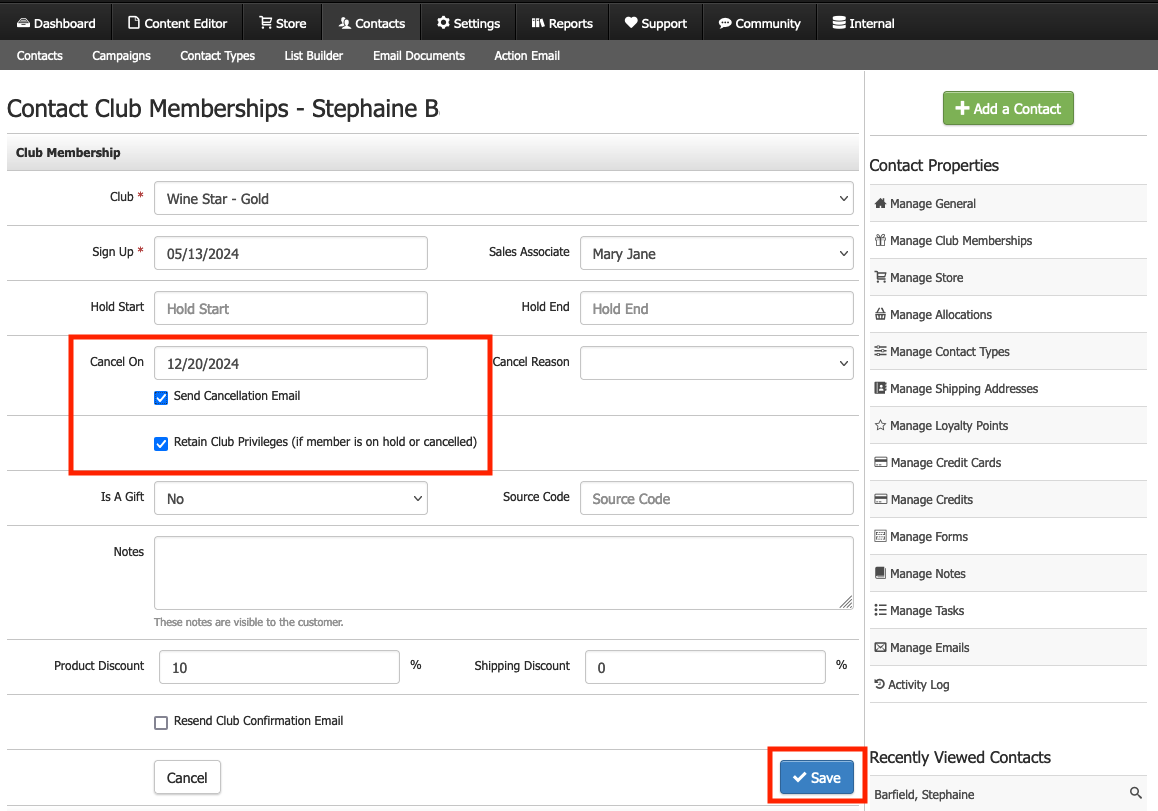
Select a date for the field "Cancel On" > Check the box to "Retain Club Privileges" only if you wish that the customer keeps his discounts and other member privileges after cancelling (if not, uncheck the Club privileges box) > Click Save.
