This powerful tool will help you to create customer lists that you can use for targeted marketing email campaigns, export specific contacts for a 3rd party service, or give you more insight into your customer database. Use the list builder to find groups of people based on where they live, what they have bought, their lifetime value, whether or not they are club members, and much more!
List builder begins by taking all contacts in your contact database and segments the List based on the parameters you enter to find a targeted group of contacts.
Create A List
1. Navigate to Contacts in your admin panel. Select List Builder.
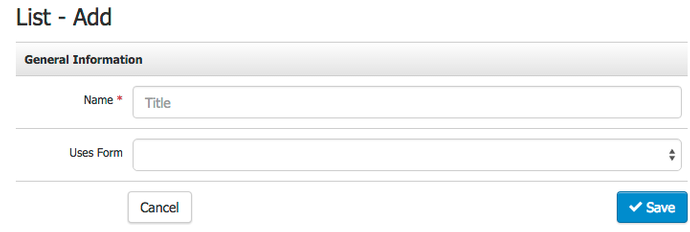
2. Click Add a List. This will take you to the first page to add General Information.
General Information
1. Give your List a name in the Name field. This is a required field to proceed to the next section.
2. (Optional) Do you want to use data collected via a form you've created? If yes, you can select the appropriate form from a dropdown on this first screen under Uses Form. You will find all of your named forms in this List.
3. Save to proceed.
Contact Options
Select the Contact Types you would like to build a list from. Alternatively, you can use a process of elimination and exclude the contact types from the search through Contact Not.
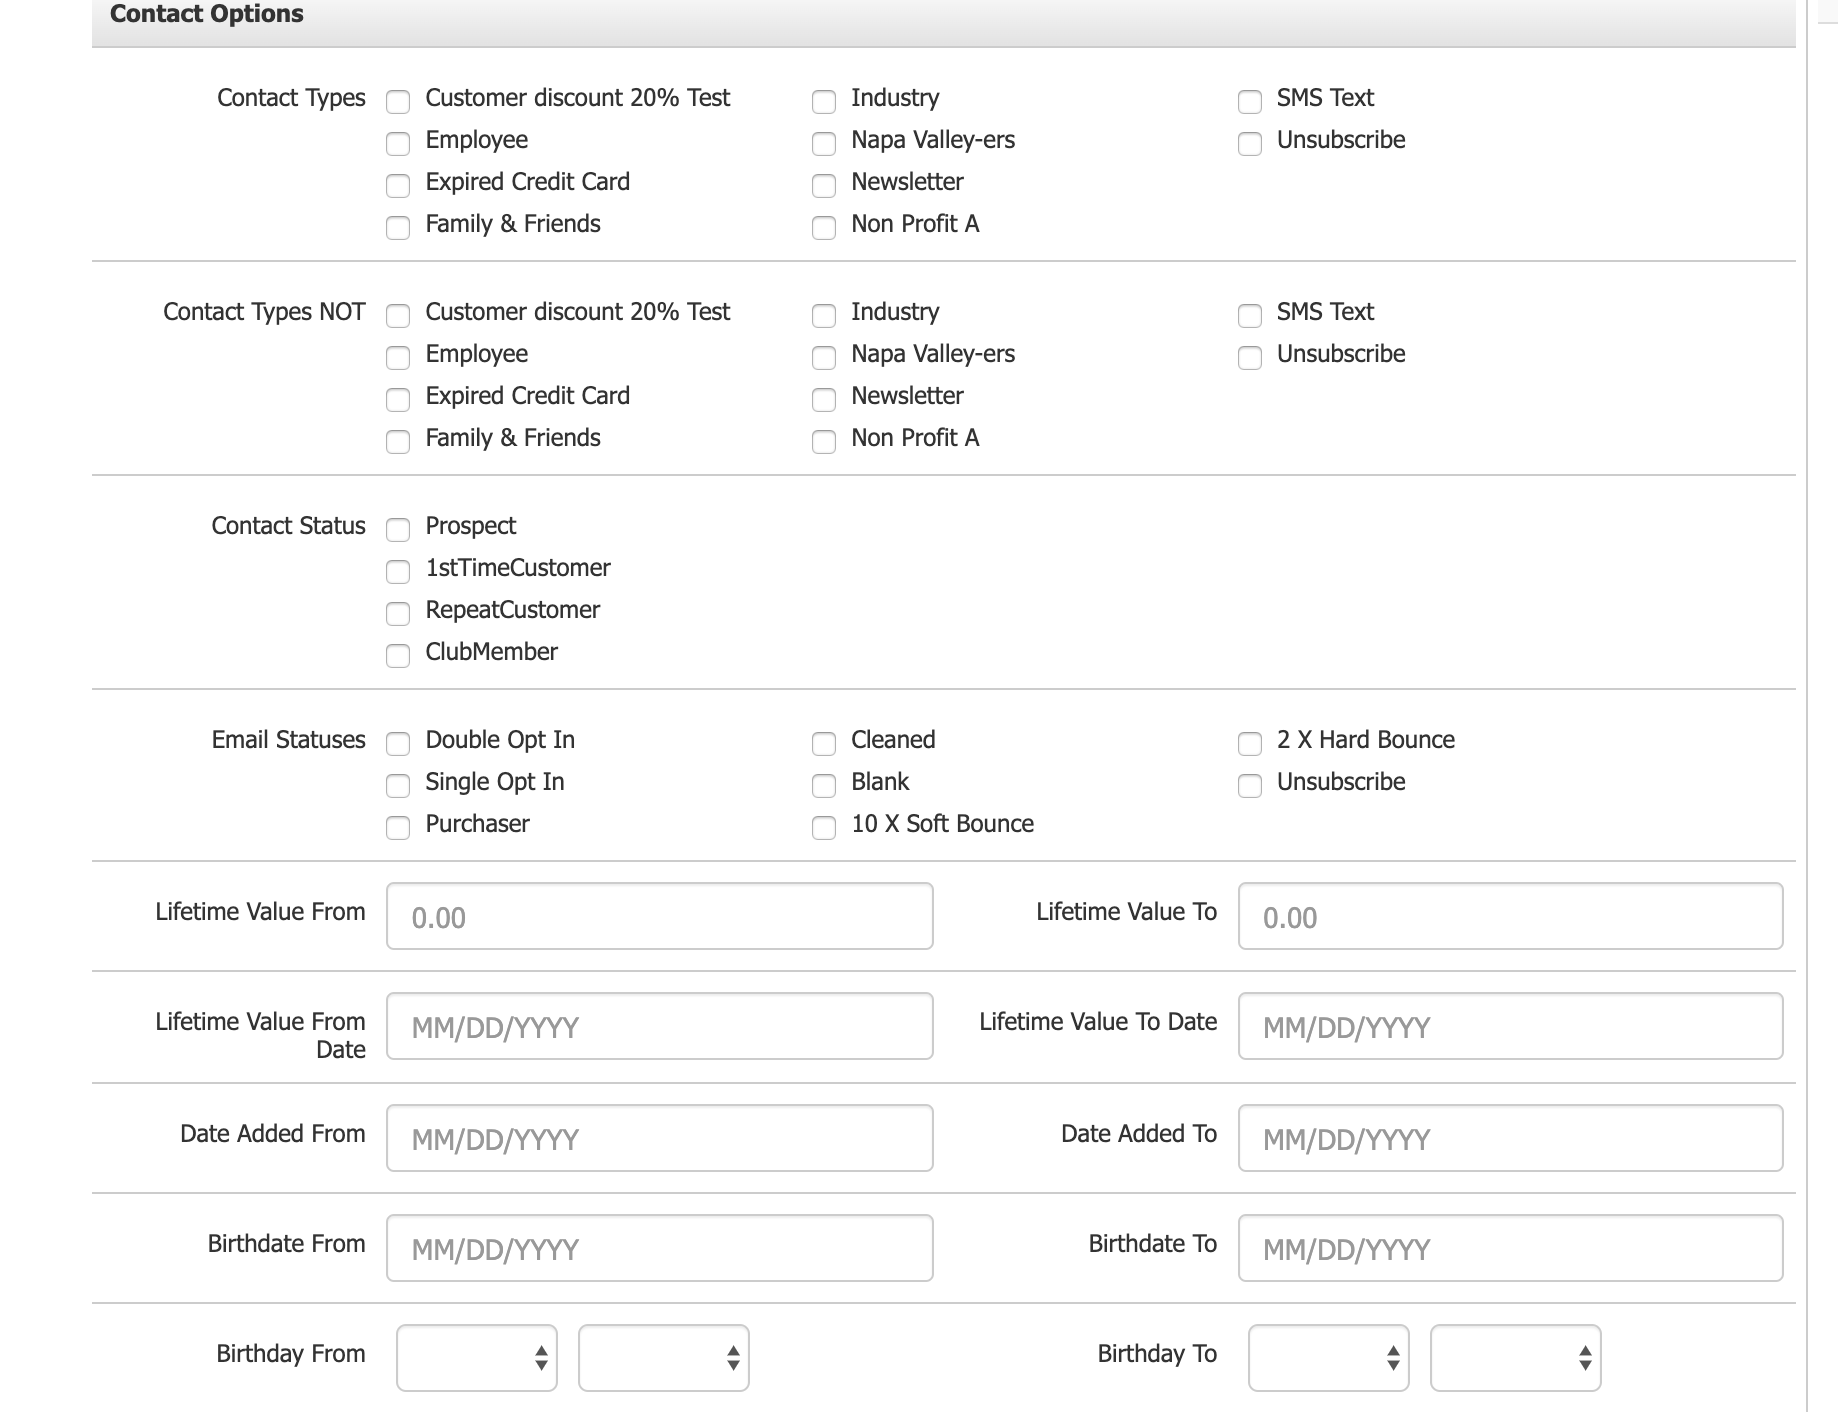
Contact Options Definitions:
| Contact Types | Contact Type(s) that you want to include for the List. |
|---|---|
Contact Types NOT Contact Status | Contact Type(s) that you want to exclude from the List. Mark the status of your customer and where they are in their customer journey. |
| Email Statuses | The type of email status that the Contact currently holds:
|
| Lifetime Value From/To | The customer's lifetime value (i.e., the total amount they've spent with you). |
| Lifetime Value From Date/To Date | The customer's lifetime value of purchases within a given date range. |
| Date Added From/To | The date range that the customer was added to the WineDirect database. |
| Birthdate From/To | A birth date range (including year). |
| Birthday From/To | Customer birthday (month and day only). |
| Last Login From/To | The date ranges from the customer last logged into your website. |
| Zip Code | The Zip Code that your Radius search is based on. (Not Available In Australia) |
| Radius | The radius range for the Zip Code. Your range is from 5 miles - 150 miles. (Not Available In Canada or Australia) |
| I haven't opened an email in the last x emails | The number of emails you sent out that the customer has not opened. |
| I haven't opened an email in the last x days | The number of days a customer has not opened your email. |
| 46Brix Member* | Is or is not a member? |
| 46Brix Expires Within* | 30, 60, or 90 days. |
| 46Brix Expires From/To* | The date range in which the customer's membership expires. Month and Year dropdowns are available. |
| States | The states you wish to include in the List of where your customers reside. |
| Countries | The countries you wish to include in the List of where your customers live. |
*Applies to Wineries registered for the 46Brix program only.
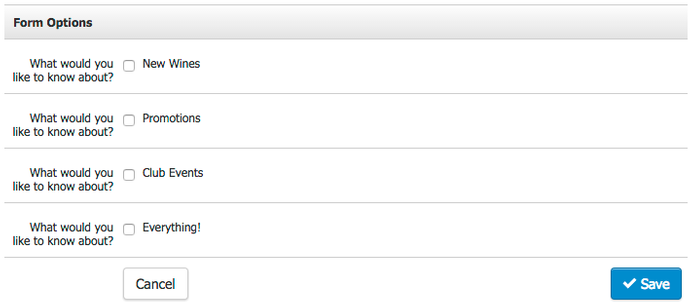
Form Options
If you selected a form for creating your List, you will see Form Options after clicking Save in the General Information section. Here you should select the relevant criteria, for example, customers who answered yes to question three on the form.
Club Options
This is where you will select relevant club information. For example, you can select only "Member Select Club" members. Alternatively, you can use the Clubs NOT feature to exclude members of a specific club (or clubs).
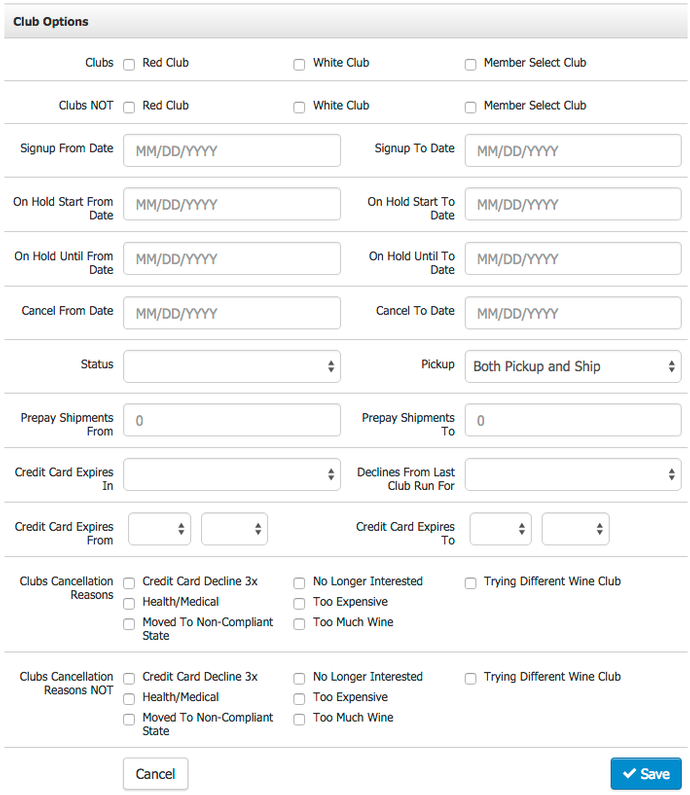
Club Options Definitions:
| Clubs | Club(s) to include in the List. |
|---|---|
| Clubs NOT | Club(s) to exclude from the List. |
| Signup From/To Date | The date range for when the club member(s) signed up. |
| On Hold Start From/To Date | The date range for when the club member(s) went on hold. |
| On Hold Until From/To Date | The date range for when the club member(s) hold ends. |
| Cancel From/To Date | The date range for when the club member has been canceled. |
| Status | Member status to say if they are active, canceled, or on hold. |
| Pickup | Members who are Pickup Members, Shipping Members, or search for both. |
| Pray Shipments From/To | PrePay club shipments range for shipments they have left. |
| Credit Card Expires In | Already expired, expired, or expires in 30 days, 60 days, or 90 days. |
| Declines From Last Club Run For | Drop down for the Club of your choice. |
| Credit Card Expires From/To | The date range of credit card expiry. |
| Club Cancellation Reasons | Reason(s) for canceling a club membership. |
| Club Cancellation Reasons NOT | Reason(s) that a person did not use to cancel a club membership. |
Product Options
This is where you'll begin to select information specific to your customer's purchasing habits.
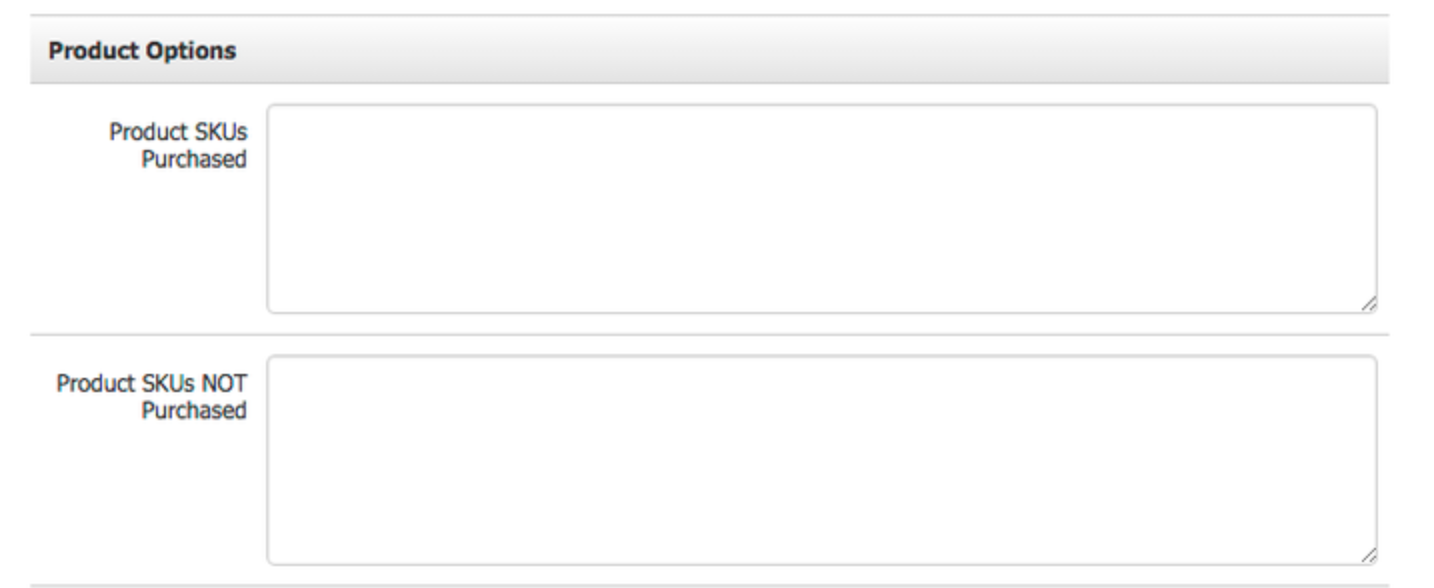
Product Options Definitions:
| Product SKUs Purchased | Put in the SKUs separated by commas that your customers have purchased. If you put in more than one, you will search for people who have purchased any SKUs. |
|---|---|
| Product SKUs NOT Purchased | Type in the SKUs separated by commas that your customers have not purchased. |
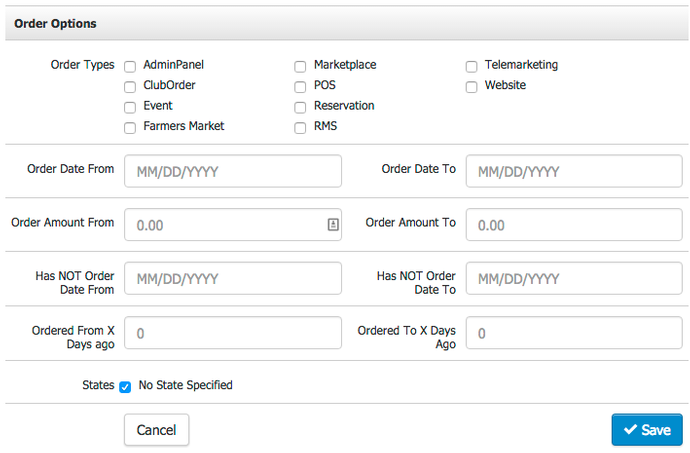
Order Options
You can filter order types by checking off the appropriate boxes (i.e., Admin Panel, POS, Club Order, Tasting Room, Reservation, etc.).
Order Options Definitions:
| Order Types | Order Type(s) that you want for your List. |
|---|---|
| Order Date From/To | The order date range. |
| Order Amount From/To | The order amount range. |
| Has NOT Order Date From/To | Customers who have not ordered in a given date range. |
| Orders From/To X Days ago | Orders placed within a date range in the past. Example: Find customers who have purchased between 10 and 30 days ago. |
| States | This allows you to specify a Billing State for the orders you are searching for. |
Allocation Options
You can select information regarding your customers' allocations using the Allocation Options section.
1. Which allocations have they selected? Check the box(es) that apply.
2. Not taking ANY of their allocations: Checking this box will give you customers who have not purchased it.
3. Not taken ALL of their allocations: Checking this box will give you customers who either have not purchased from the allocation or have not purchased the maximum allocation.
4. Has purchased from the allocation: Checking this box will give you only customers who have purchased from the allocation.
5. Has WISHED for more from the allocation, select Yes or No from the dropdown menu.
6. Has GRANTED more than the allocation, select Yes or No from the dropdown.
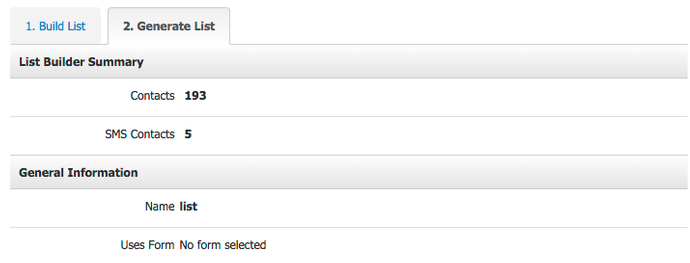
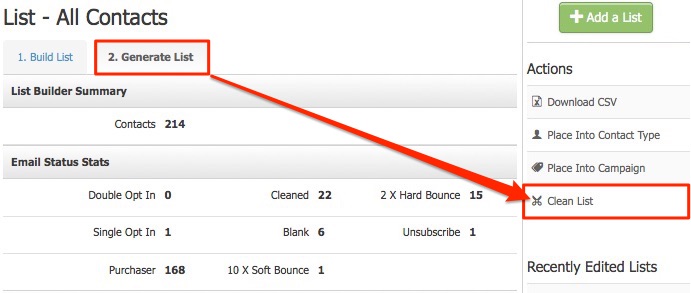
Generate List
1. Once you've built your List, click the Generate List tab. Here you will see a summary of the number of contacts in the List and the filters you have selected to build your List.
2. From the List Actions menu, select Download CSV.
There are additional list actions available beyond simply downloading your List.
List Actions
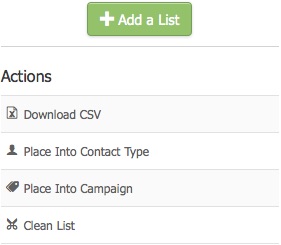
| Download CSV | This will display in the Admin Panel and is used for your organizational purposes. It will not be visible on the website. |
|---|---|
| Place Into Contact Type | If your List comprises 2,000 contacts or fewer, you can automatically add members to a contact type. Please use caution when checking off the box to Replace Contacts in Contact Type with This List. If this box is unchecked, you can add your List to the current contact type. If the box is checked, it will take everyone out of that contact type and replace it with the List you have just built. |
| Place Into Campaign | Place contacts into a telesales campaign. A feature designed for those using WineDirect Outbound. Curious? |
| Clean List | Create more effective marketing email lists by ensuring that the email addresses have been cleaned and verified as valid. Only contacts without email addresses verified through a clean list (Email Status = Blank) will be cleaned. The Clean List option will only appear if your List has contacts with a Blank Email Status. See Clean List Documentation for more information. |
Clean A-List
You need valid email addresses for your contacts to have an effective email marketing campaign. To help you achieve this, any List Builder Lists that include contacts with a Blank Email Status will display the Clean List tool under Generate List > Actions.
Master Clean List (Clean All Contacts)
If you are starting and have not done a clean list function for your entire contact database, it is best to create a master list and run a Clean List function. In a few easy steps, you can clean your whole contact database. This List can be saved and used periodically to clean your contact database.
1. Go to Contacts > List Builder.
2. Click Add A-List.
3. Under General Information, name your List (i.e., All Contacts). Do not select anything under Uses Form.
4. Click Save.
5. Click Generate List and wait for your List to generate. You will be given a summary of all your contacts, including the number of Blanks you need to clean.
6. From the Actions menu, click Clean List.
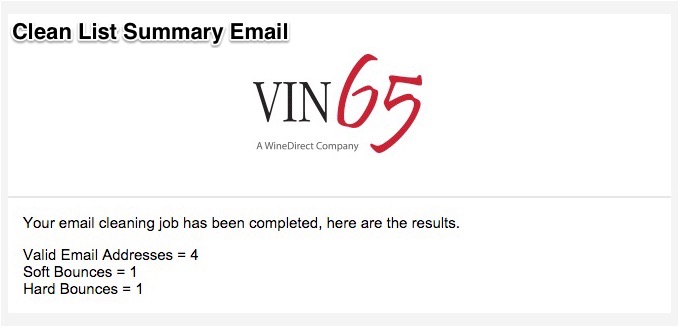
7. A popup window will appear with the total number of Blank Contacts to Clean. You will receive a notification email when the list cleaning is complete. Enter the Notification Email address where you want to receive this summary email.
8. Click Clean List and then OK on the confirmation popup.
9. A progress bar will keep you up to date on the status of preparing your List for the clean function. Please leave this running until your List has been completely cleaned. Once completed, you will see a summary screen and a summary email will be sent to the notification email confirming that the cleaning has been completed. Click Close to dismiss the summary.
Now that your entire contact database has been cleaned, you can start sending emails through the Send Grid mass email tools, which offer a faster send process and more robust email tracking, including eCommerce conversion and club signups based on the email and links within it.
Clean List (Clean A Single List)
After creating and generating a list, you will be given a summary of all the contacts with a Blank Email Status. You cannot email the List through Send Grid until the List has been cleaned. Use the steps below to clean a list.
1. Go to Contacts > List Builder.
2. Create or select your List and click Generate List.
3. From the Actions menu, click Clean List.
4. A popup window will appear with the total number of Blank Contacts to Clean. A notification email will be sent when the List has completed the cleaning. Enter the Notification Email address you want to receive this summary email.
5. Click Clean List and the secondary OK on the confirm popup.
6. A progress bar will keep you up to date on the status of preparing your List for the clean function. Please leave this running until your List has been completely cleaned. Once completed, you will see a summary screen, and a summary email will be sent to the notification email address confirming that the cleaning has been completed. Click Close.
Now that your List has been cleaned, you can send an email to it using the Send Grid mass email tools, which offer a faster send process and more robust email tracking, including eCommerce conversion and club signups based on the email and links within it.
List Builder FAQs
Why is the clean list function not appearing?
If you do not see the option to clean your list after generating your list, then it is likely that there are no contacts within the list that have a Blank Email Status requiring them to be cleaned.
Why is the List Builder not letting me "Copy" my List to a different Contact Type?
The List Builder is not able to copy a Contact Type or a list into a different Contact Type if the list is over 2000 names. This might be why you are encountering this issue. The solution is the following steps:
- In the List Builder go to the Summary tab of your list or contact type and download it. This is your List Builder Excel file.
- Now go to Settings > Import/Export > Customer Importer > Download Sample File.
- Copy the email addresses from the List Builder Excel file and paste them into the Customer Import Sample file.
- Also add in the new Contact Type name that you want these customers added to in the Contact Type column. You can fill the whole column really quickly. See an Easy way to do this with a Fill Handle.
- Import that Excel file.
The Email address column and Contact Type column are the only two columns you need to fill and you can leave everything else blank. When you import these contacts, this will add them to the new Contact Type without deleting any of their data.
How do I make a list of customers that have never purchased?
To create a list of people who have never purchased from you before, you would follow these steps:
- Go to List Builder > add a new list
- Once you have given it a name go to the Orders tab > in the section "Has NOT Order Date", put in a very long date range that extends past your order history records.
- This will create a list of people who have not ever purchased on your database.
How do I create a list of people not belonging to a Contact Type?
- Create a new List by going to Contacts > List Builder. Make sure the Contact tab has Contact NOT set for all contact types. This ensures your list contains the contacts without contact types.
- In the Summary tab you can then download this list to an excel file or you can email these customers using the Send Mass Email tool if needed.
How do I list people without a Contact Type belonging to a new Contact Type?
This can be done with a few steps.
- Create a new List by going to Contacts > List Builder. Make sure the Contact tab has Contact NOT set for all contact types. This ensures your list contains the contacts without contact types.
- In the Summary tab you can then download this list to an excel file. Keep this excel file open.
- Now go to Settings > Import/Export > Customer Importer. Download the sample file.
- Copy all of the email addresses from the list builder excel file, and paste them into the sample import file in the Email column. In the Contact Types column for the sample file, put the Contact Type name you wish to add these contacts to in that column.
- Save and import it - it will automatically map those customers to that Contact Type. Please make sure that you spell the Contact Type exactly the same it is in WineDirect. Once you type it in the column, you can quickly drag it down to copy or fill to the rest of the rows. More info about filling excel files can be found here.
- Once saved, import this file (the blank data will not erase any data on your customers).
- You can choose "Don't Overwrite Data" and then import the file.
There is a list within the list builder that I cannot delete. Why can't I remove this List?
When a Contact Type is made, a list containing all current members of the Contact Type is generated on the List Builder page. They are marked with an asterisk (*). They can only be deleted if the Contact Type is deleted.
Will the clean list tool send an email to my contacts?
No, your customers will not be aware that you are using the clean list tool. All communication occurs behind the scenes between the list cleaning service (Brite Verify) and the servers that the email addresses are supposed to be attached to. The customer will never receive an email regarding the list cleaning.