Account Sign Up Form Settings
- 12 Mar 2024
- 4 Minutes to read
-
Print
-
DarkLight
-
PDF
Account Sign Up Form Settings
- Updated on 12 Mar 2024
- 4 Minutes to read
-
Print
-
DarkLight
-
PDF
Article summary
Did you find this summary helpful?
Thank you for your feedback
Customers must enter some basic account and address information when creating an account or during checkout. These fields can be changed to display a different label, show default or example text, or rearrange their order.
Depending on your business, adding or changing your store's default form fields can help you learn more about your customers and improve your workflow. For example, many merchants commonly add a "How did you hear about us?" field to help track marketing efforts. You can also use custom fields to survey and collect additional information about your customers, like their communication preferences.
Go to Settings › Account signup form to access and change your store's account signup and address forms.
Did you know? Unless you are logged in as the store owner, your control panel user account must have permissions enabled to manage, add, edit, and delete form fields.
Account Signup Fields
WineDirect stores allow customers to create an account, encouraging them to return by making the checkout process faster.
Three built-in customer account signup fields are necessary for the customer account functionality to work:
- Email Address
- Password
- Confirm Password
If Require Consent is enabled in your store's Ecommerce Settings > General > Miscellaneous > Require Consent, you will see a fourth built-in field, Exclusive Offers. This allows customer signups to opt into abandoned cart emails and other marketing emails. Unlike the previous areas, this checkbox is set as not required by design, as this would prevent customers from opting out of marketing emails.
These built-in fields cannot be removed but can be edited to match your store's branding. Additional required and optional form fields may be added to the account signup form.

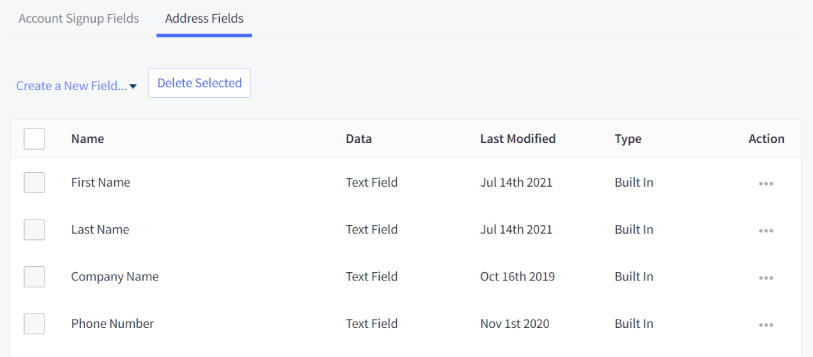
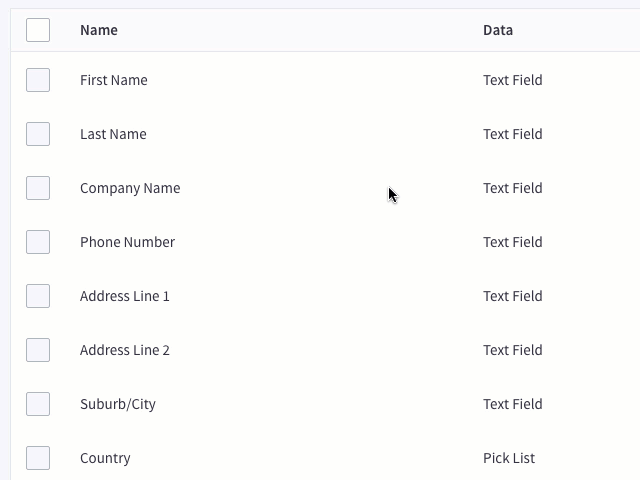
Address Fields
Customers with an account can save their address information in your store so that the next time they visit, they do not have to enter it again. The same form is used for billing and shipping addresses, though the data they provide can differ.
There are eight built-in required address fields:
- First Name
- Last Name
- Phone Number
- Address Line 1
- Suburb/City
- Country
- State/Province
- Zip/Postcode
There are two additional built-in fields, but they are not required by default:
- Company Name
- Address Line 2
These fields cannot be removed, but they can be renamed. However, you must edit your theme files to rename built-in fields on the checkout page. Other required and optional form fields may be added to the address form.
Adding Fields
There is no limit to the number of form fields a checkout can have, but we recommend keeping the checkout as short as possible. Having an extended checkout experience can negatively affect your conversion rate.
1. Go to Settings › Account sign up form, then click the Create a New Field dropdown.
2. Select which type of field to create.
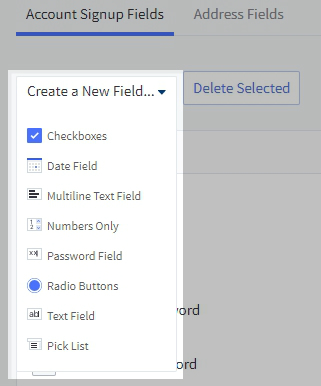
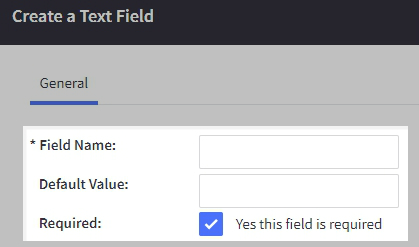
3. Each type will have a different setup window, but all will have a name, value, and required element.
The Field Name is the customer-facing label that appears to the left of that field on the storefront. You may also designate a Default Value if you would like the area to be pre-filled with a call-to-action or example text data.
Required specifies if this field must be filled, selected, or checked before submitting the form. By default, required fields appear on the storefront with an asterisk (*).
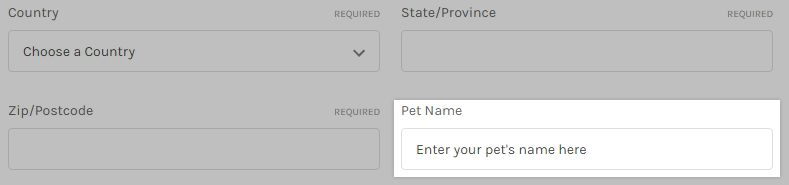
In our example, we have added an optional text field for Pet Name to the address form and made its default value Enter your pet's Name here.
You can rearrange fields by selecting and dragging them up or down in the list. This will change their order on the account signup form and the checkout page.
Deleting Fields
You can delete any account signup or address fields that were manually added; however, you cannot delete the built-in fields.
Check the box(es) next to the field you want to remove, then click Delete Selected.

Field Types
Several fields are available to add to the account signup form and checkout page. These include checkboxes for providing simple opt-ins to your customers, text fields to input special instructions, and more.

- Checkboxes — create one or more checkbox fields.
- Date Field — allows a customer to specify a date. You can select a date range from which to choose.
- Multiline Text Field — creates a text field for inputting multiple data lines, such as Delivery Details.
- Numbers Only is similar to a regular text field but validates for numbers only. You can specify a valid number range for the customer to input.
- Password Field — creates a text field that hides the data typed on the customer's screen for security purposes.
- Radio Buttons — creates a multiple-choice option that presents all values. A customer selects their desired value by filling in the circle to the left of it.
- Text Field — creates a simple text field, such as First Name
- Pick List — makes a multiple-choice option that presents values in a dropdown menu. This can help condense lists with several matters, giving the checkout a cleaner and sleek design.
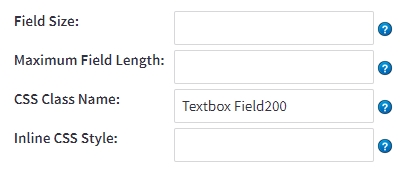
Advanced Settings
All form fields can apply a custom CSS Class Name and Inline CSS Style. Some form field types also include settings for determining Field Size and Maximum Field Length. These can be used to add additional style elements. Follow the steps below to review and edit these fields.
1. Go to Settings › Account signup form.
2. If changing an address field, click the Address Fields tab. If not, move on to step 3.

3. Click the Action icon, then Edit on the field you want to change.
4. Make your desired adjustments, then Save your changes.
Was this article helpful?